
This is a spectacular one-of-a-kind piece.


| Type | Violin-shaped braising pan in tinned copper with copper handles |
| French description | Jambonnière en forme violon en cuivre étamé avec anses en cuivre |
| Dimensions | 56cm (22 inches) along the long axis, 26cm (10.2 inches) at widest point; 12cm (4.7 inches) to rim of base piece, 18cm (7.1 inches) total with lid |
| Thickness | 1mm sidewalls |
| Weight | 3778g (8.3 lbs) base only; 6662g (14.7 lbs) with lid |
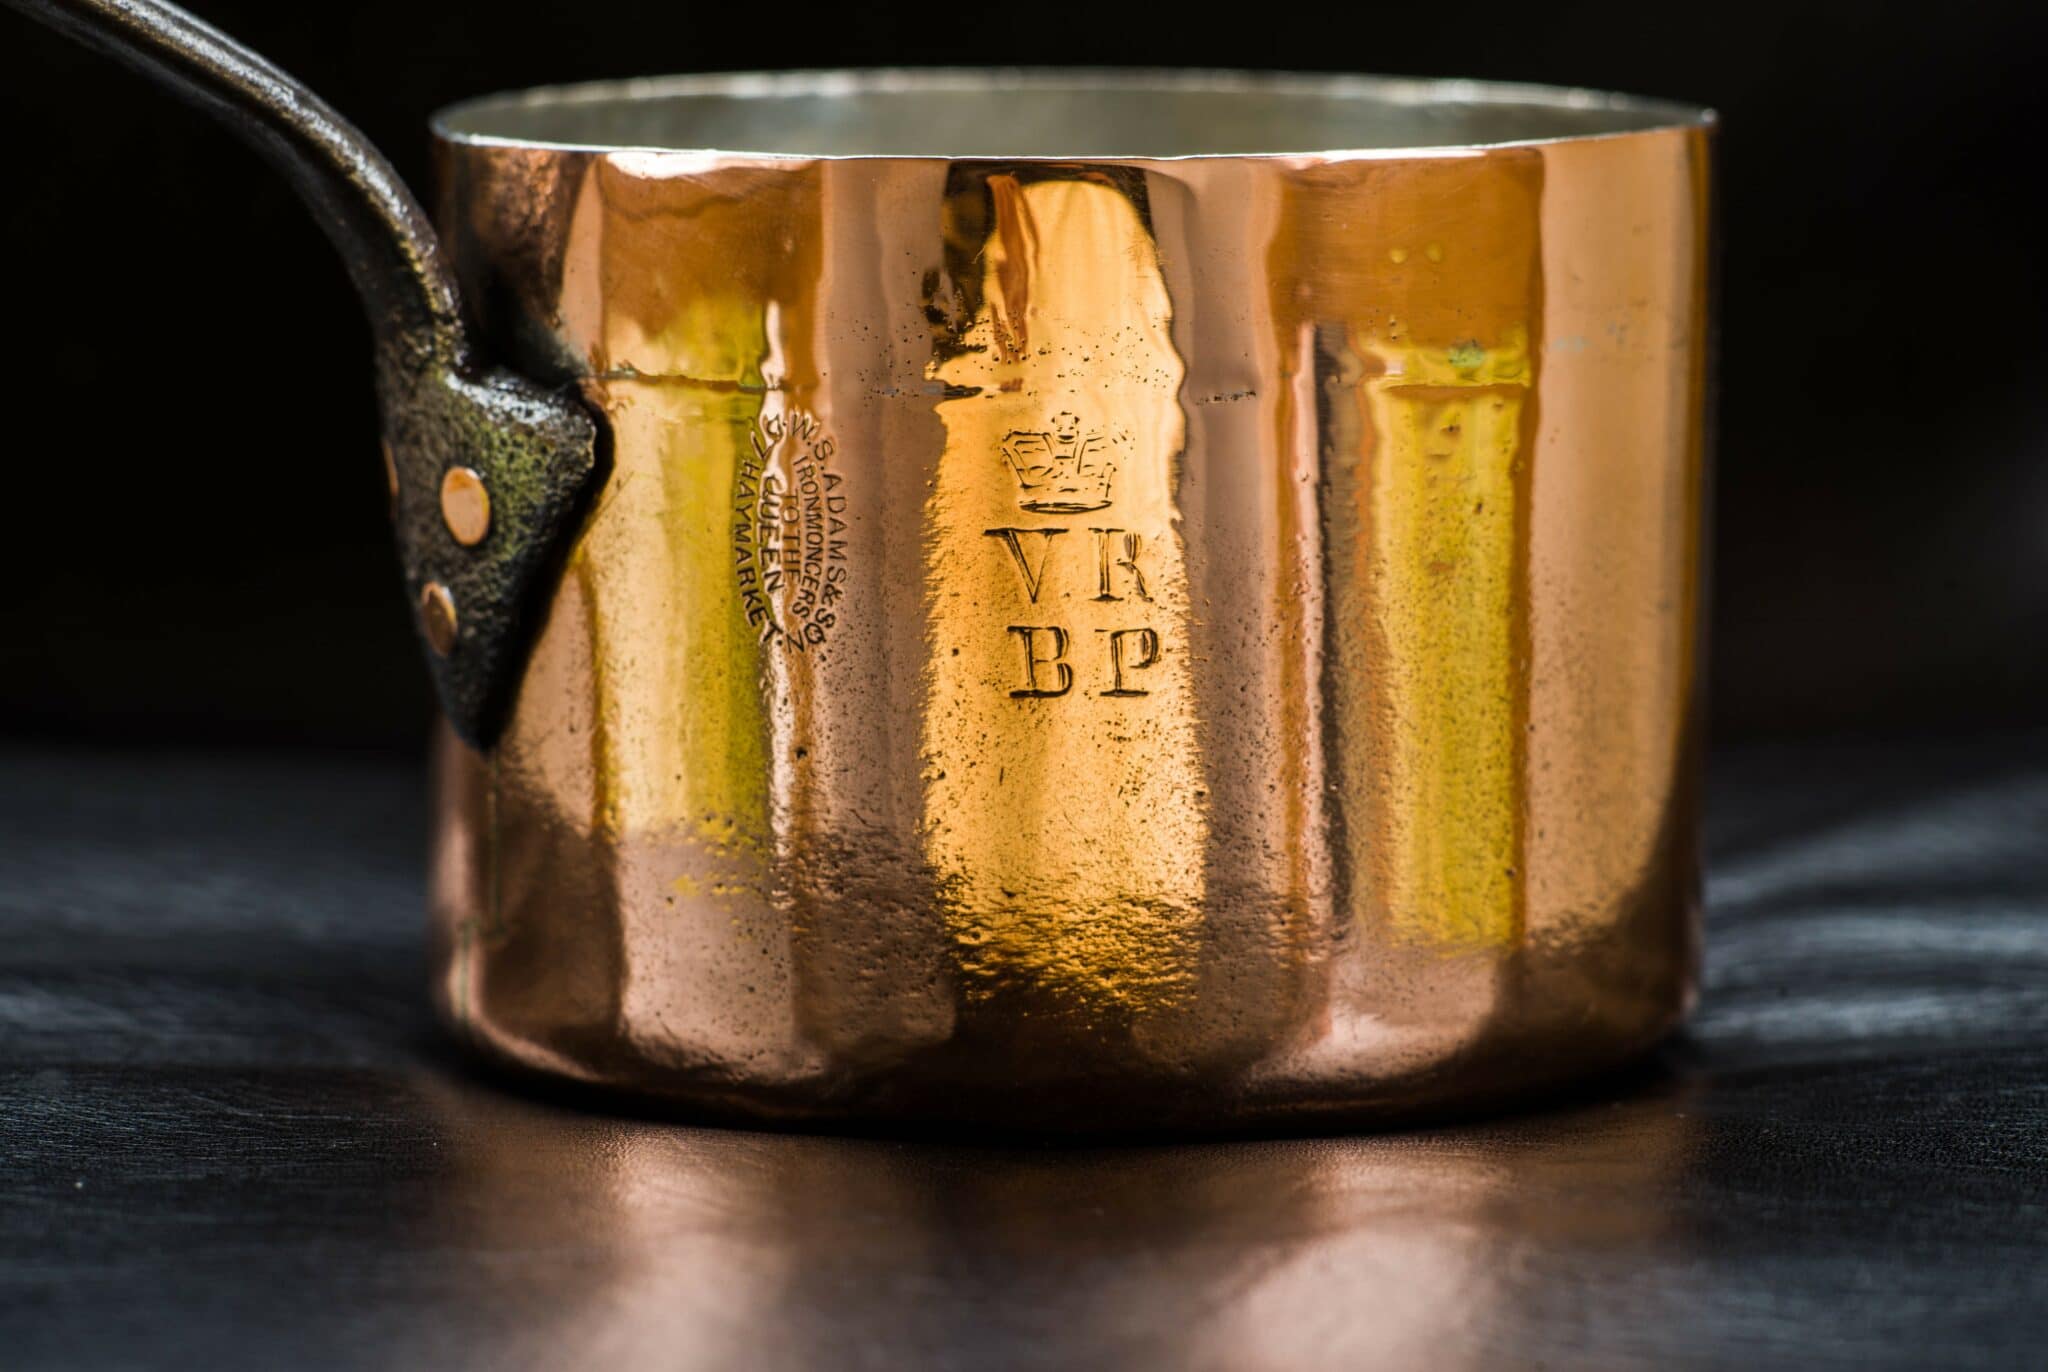
| Stampings | None |
| Maker and age estimate | Unknown, likely French; early to mid 19th century |
| Source | Private seller |
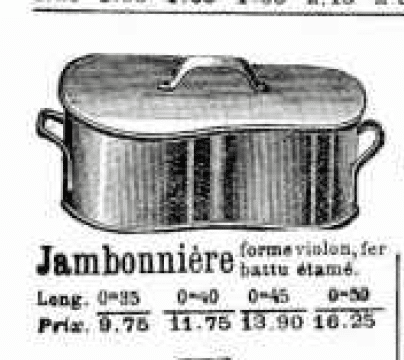
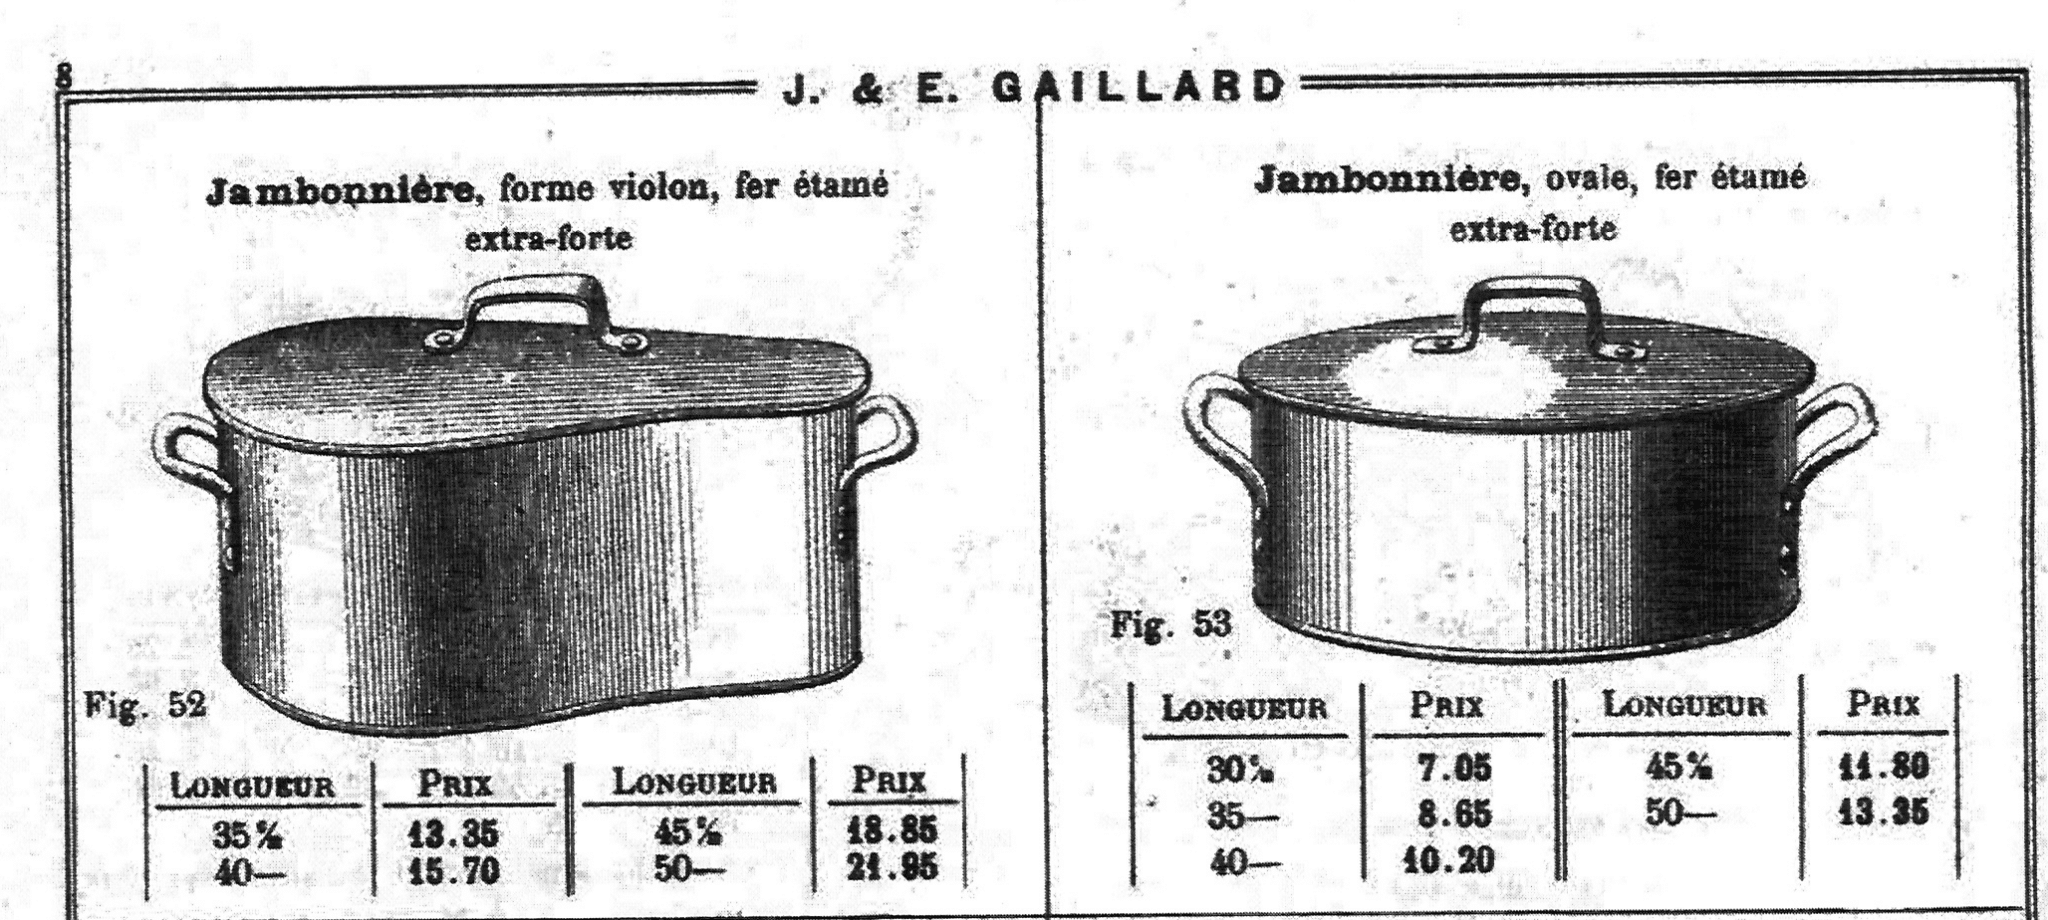
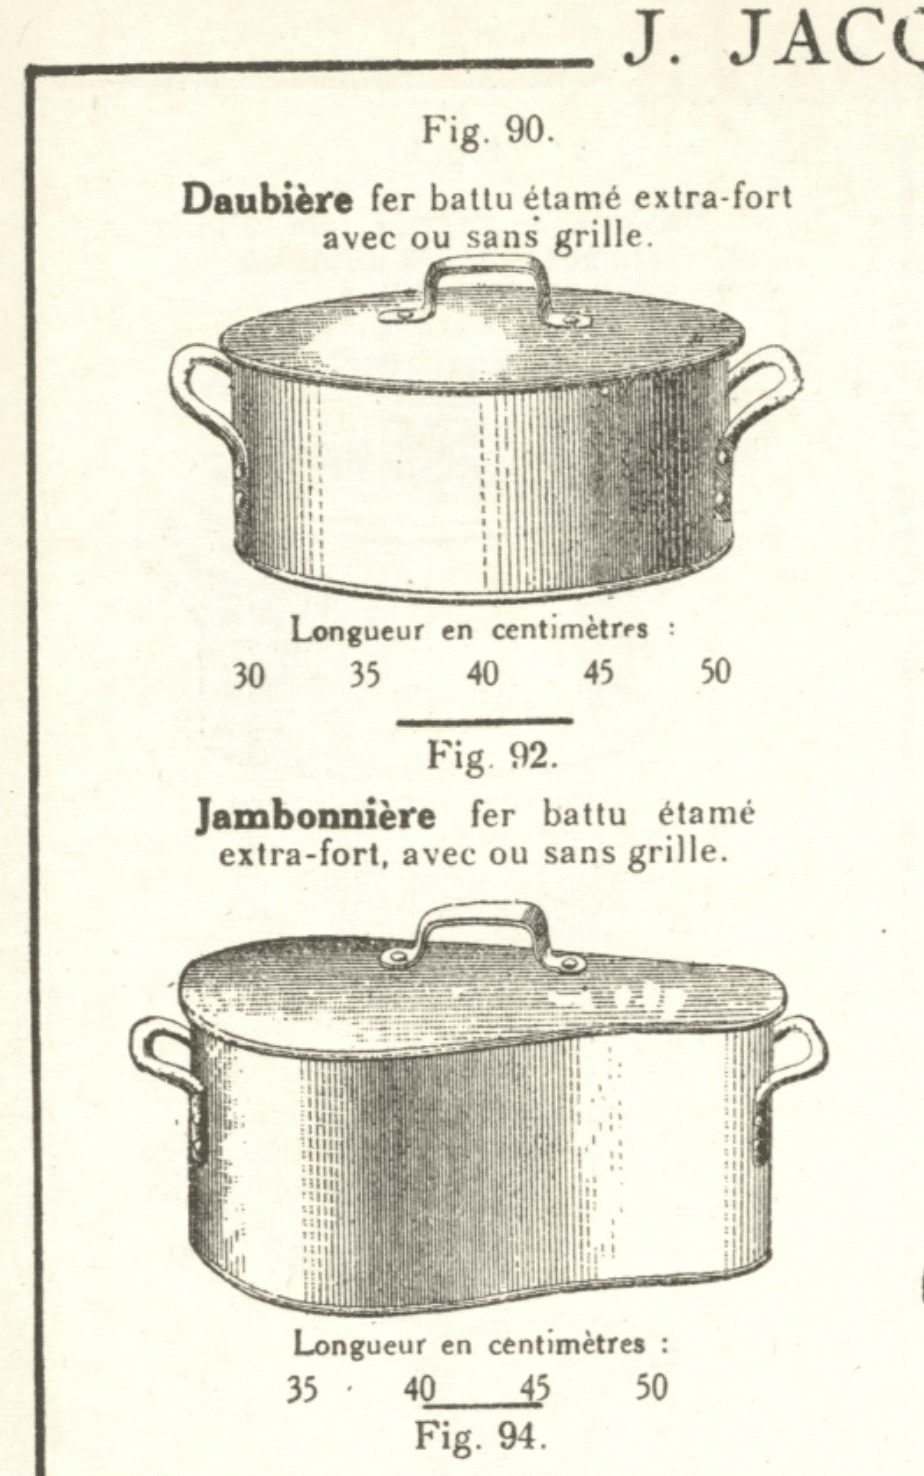
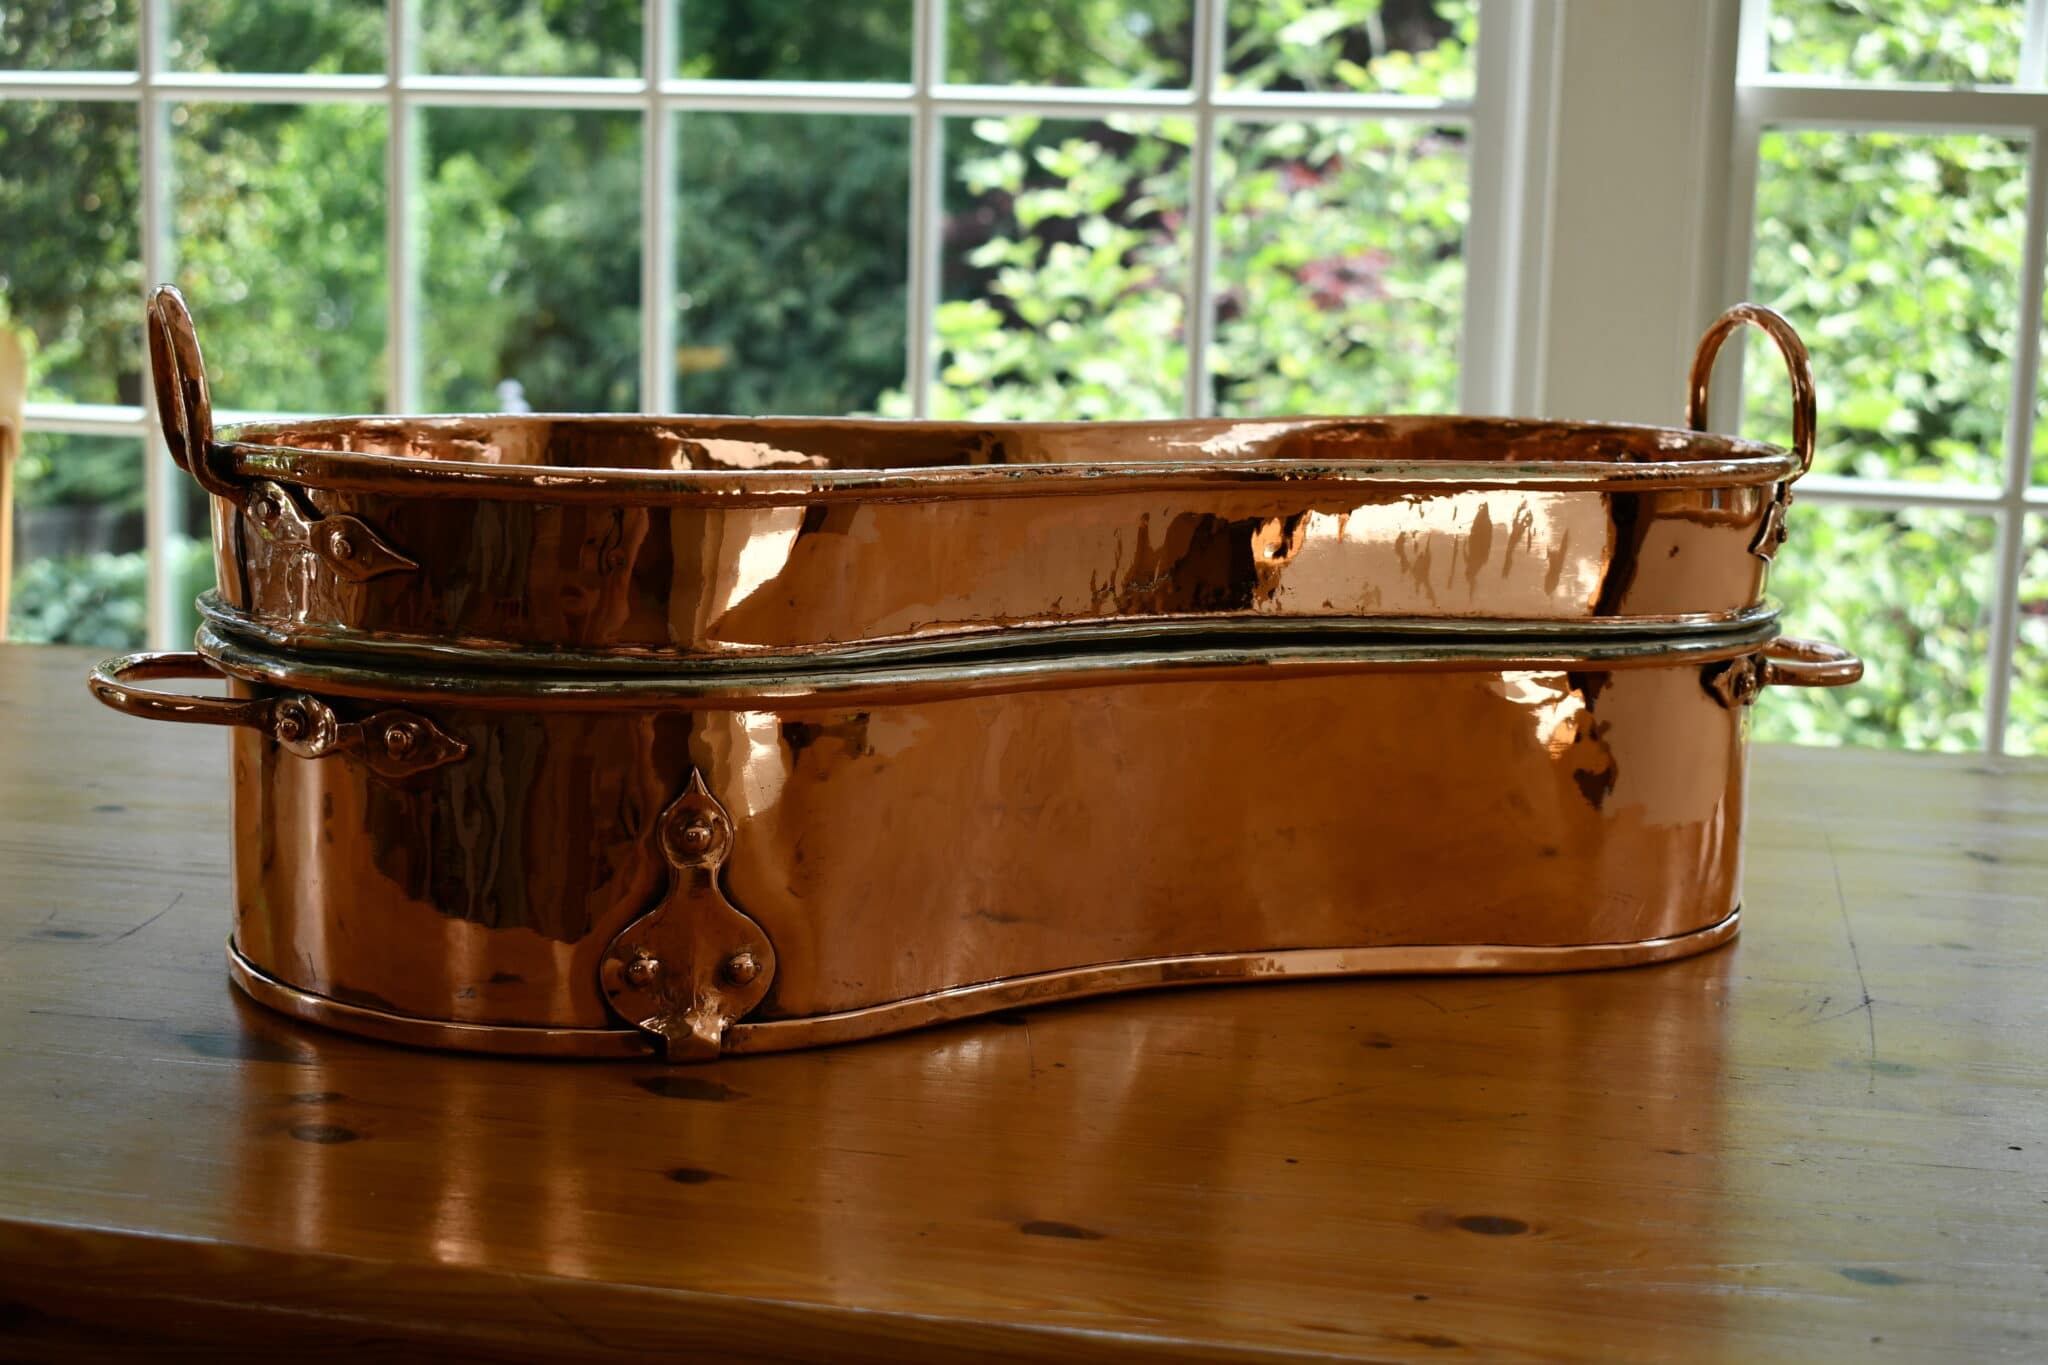
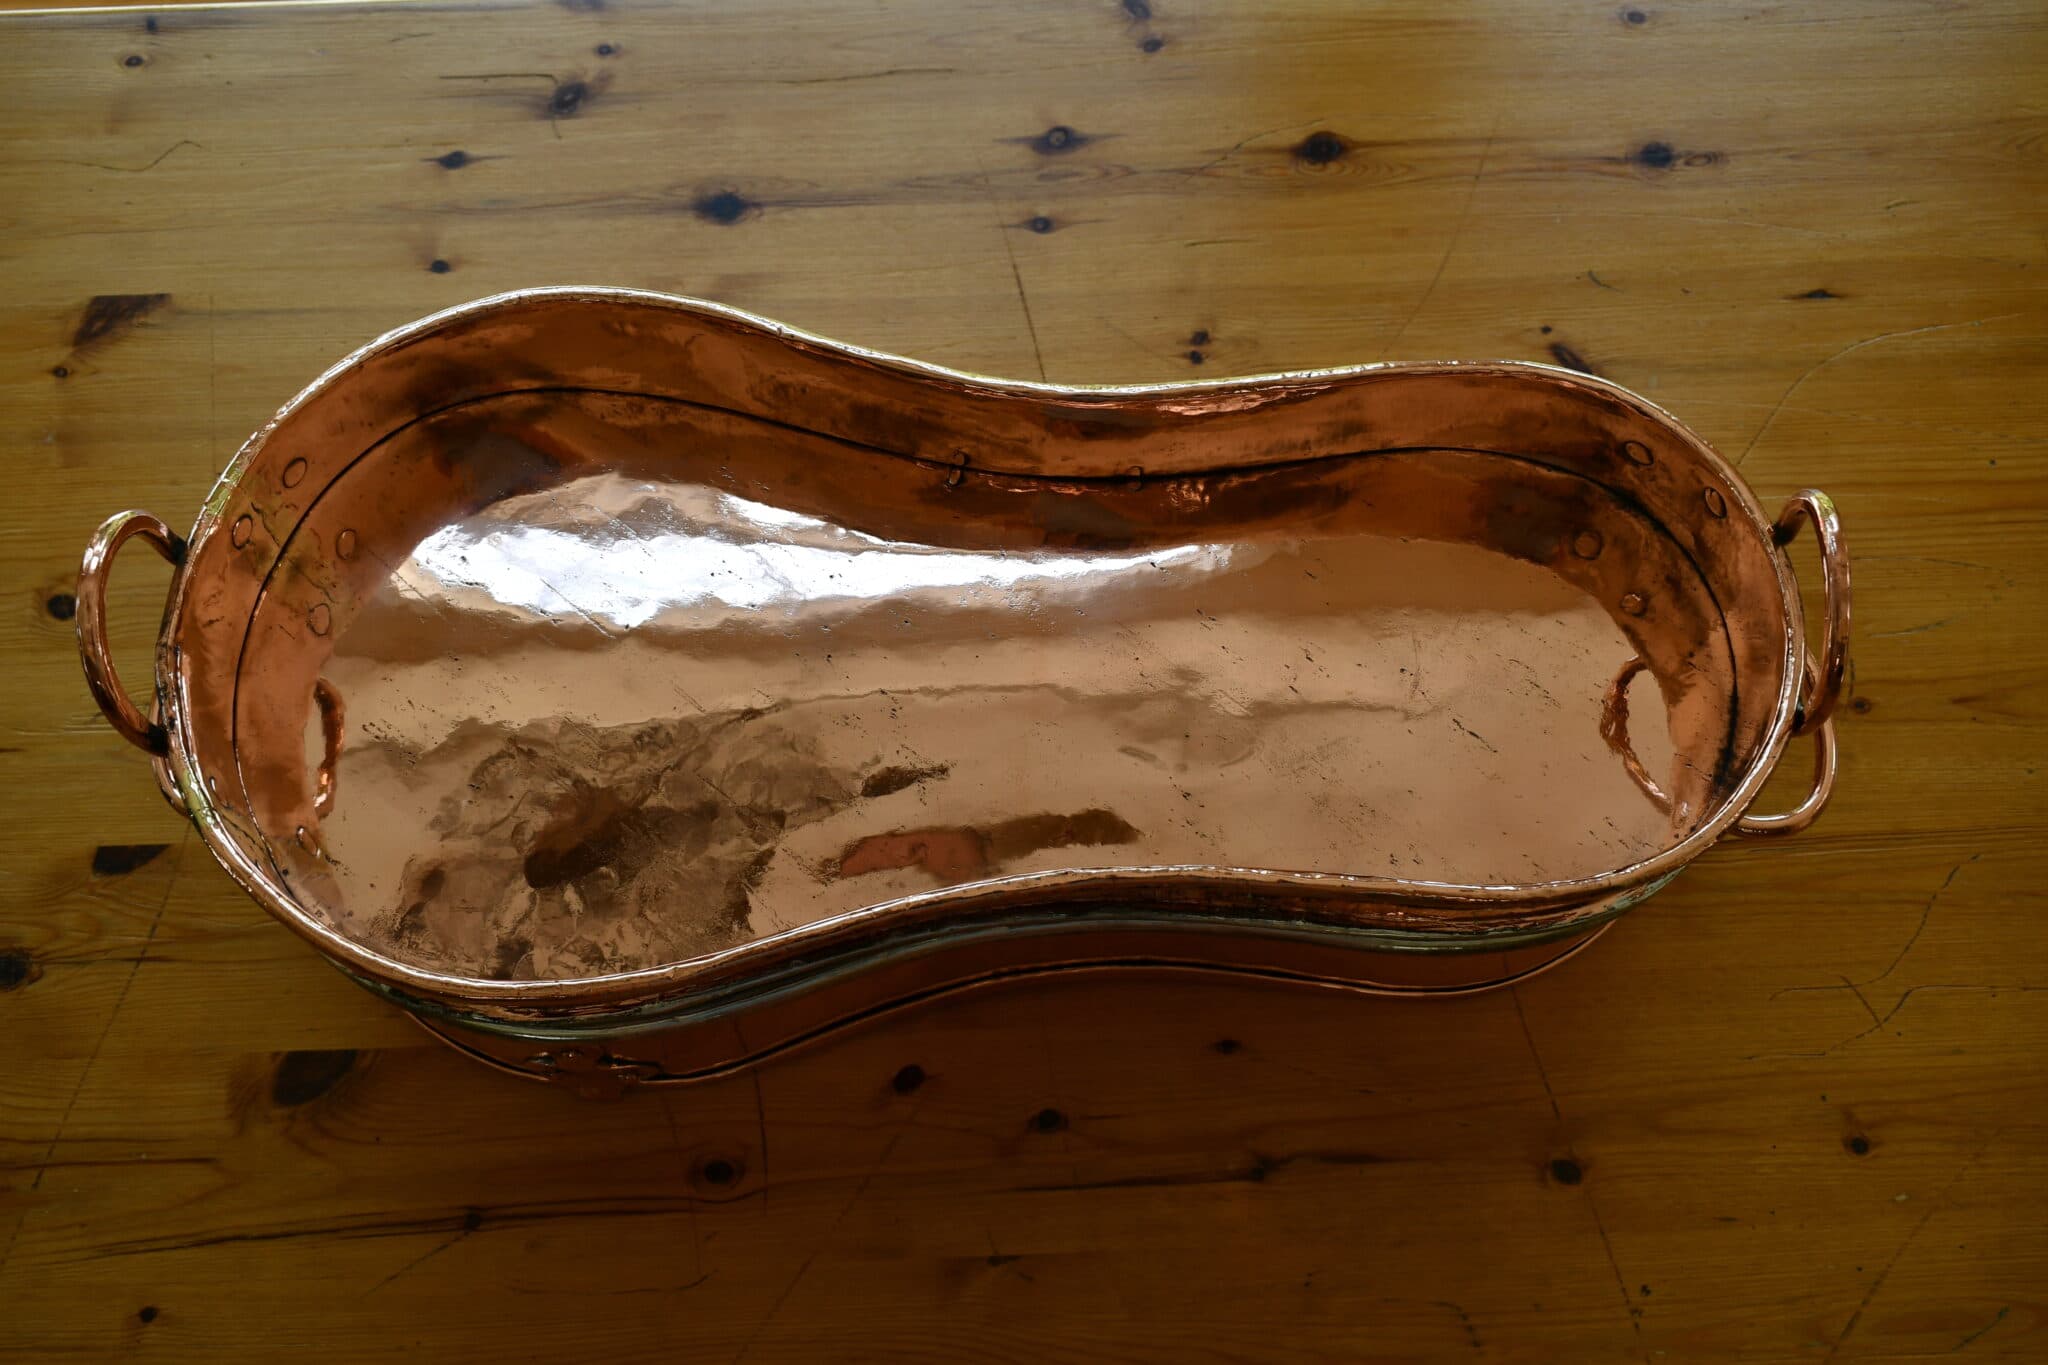
This is a jambonnière, a braising pan sized for a large ham (jambon) or other bone-in meat such as a beef shank, large leg of lamb, or other large cut. Jambonnières were made in a symmetrical ovale or in a curvaceous shape wider at one end that the French catalogs call forme violon (violin shape). I see both shapes offered in the catalogs for Grands Magasins du Louvre in 1911, Gaillard in 1914, and Jacquotot in 1925, but note that the pieces are offered not in cuivre but instead in fer étamé — that is, iron lined with tin.
I have two examples, both in copper: a 50cm jambonnière ovale and this 56cm forme violon.

Right away you can see that these pieces are of two different eras. My jambonnière ovale has a relatively straightforward construction: the symmetrical oval base is joined by cramp seams (also known as dovetails) to a single sheet of copper bent to form the vertical sidewalls. Two pieces of copper form this entire pan. To my eye this is a 20th century piece, dovetailed due to its dimensions but otherwise exhibiting the smooth contours of machine-assisted assembly.
By comparison, the jambonnière en forme violon is far more complex. My examination shows that it is assembled from at least seven pieces of copper (not counting the handles). This is the work of a master smith capable of precision measurements and fine joinery work. That said, it has many small imperfections — minor misalignments, slight underlaps here and there — that characterize a completely hand-made piece.
Let’s look at it from the ground up. The floor of the pan is a single sheet of copper that defines the distinctive violin shape. (Please also appreciate the beautiful restoration work done by Erik Undiks at Rocky Mountain Retinning. He did a marvelous job cleaning and re-tinning this piece and deserves your consideration for both routine cookware renewal as well as precision work on antiques such as this.)

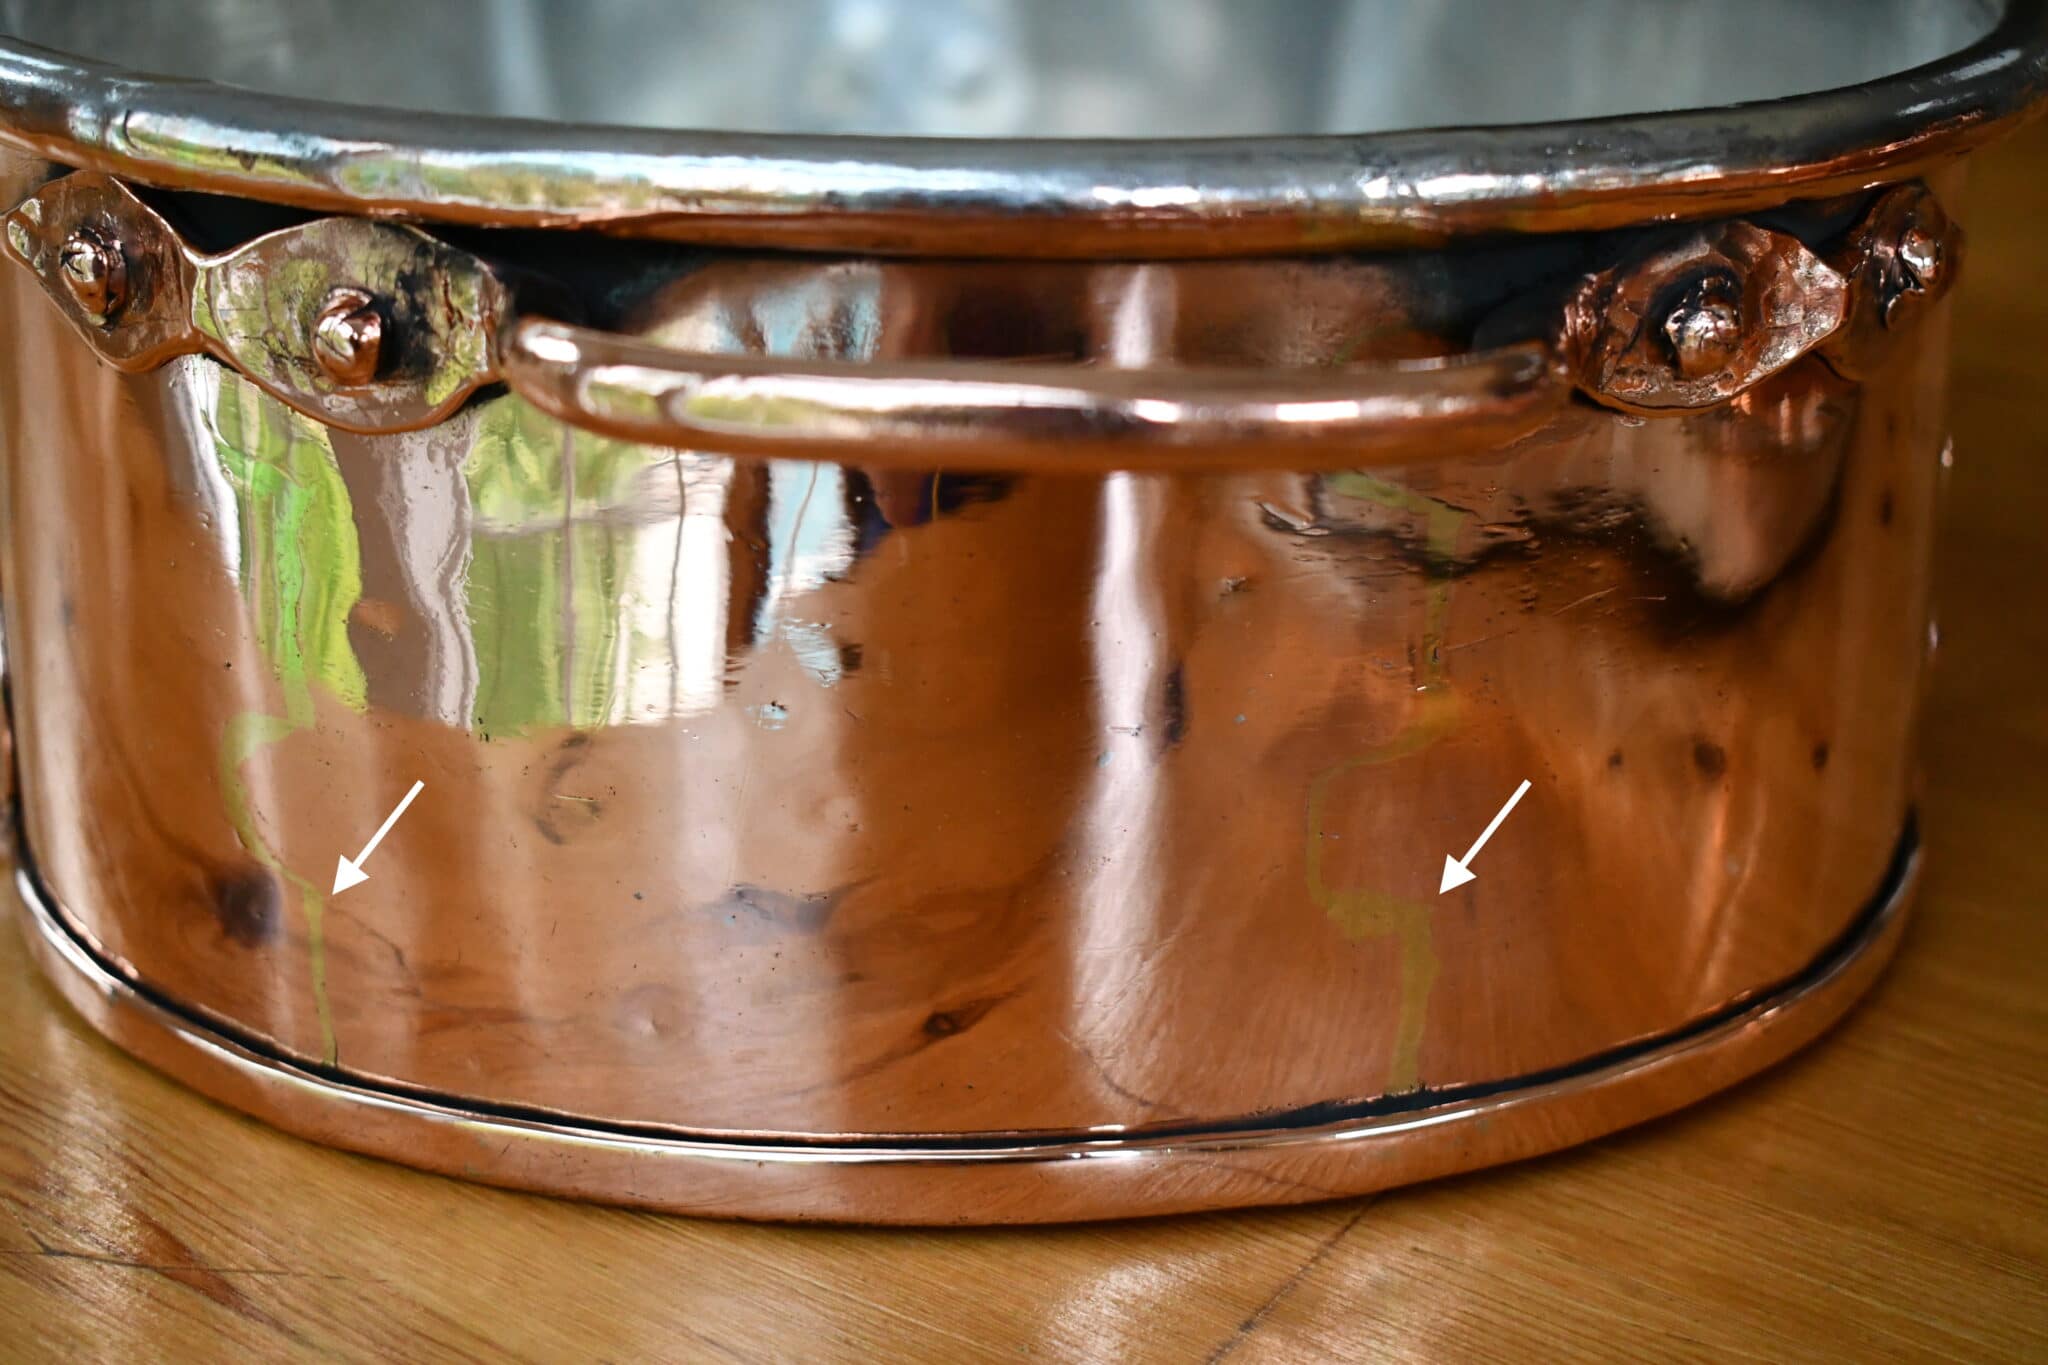
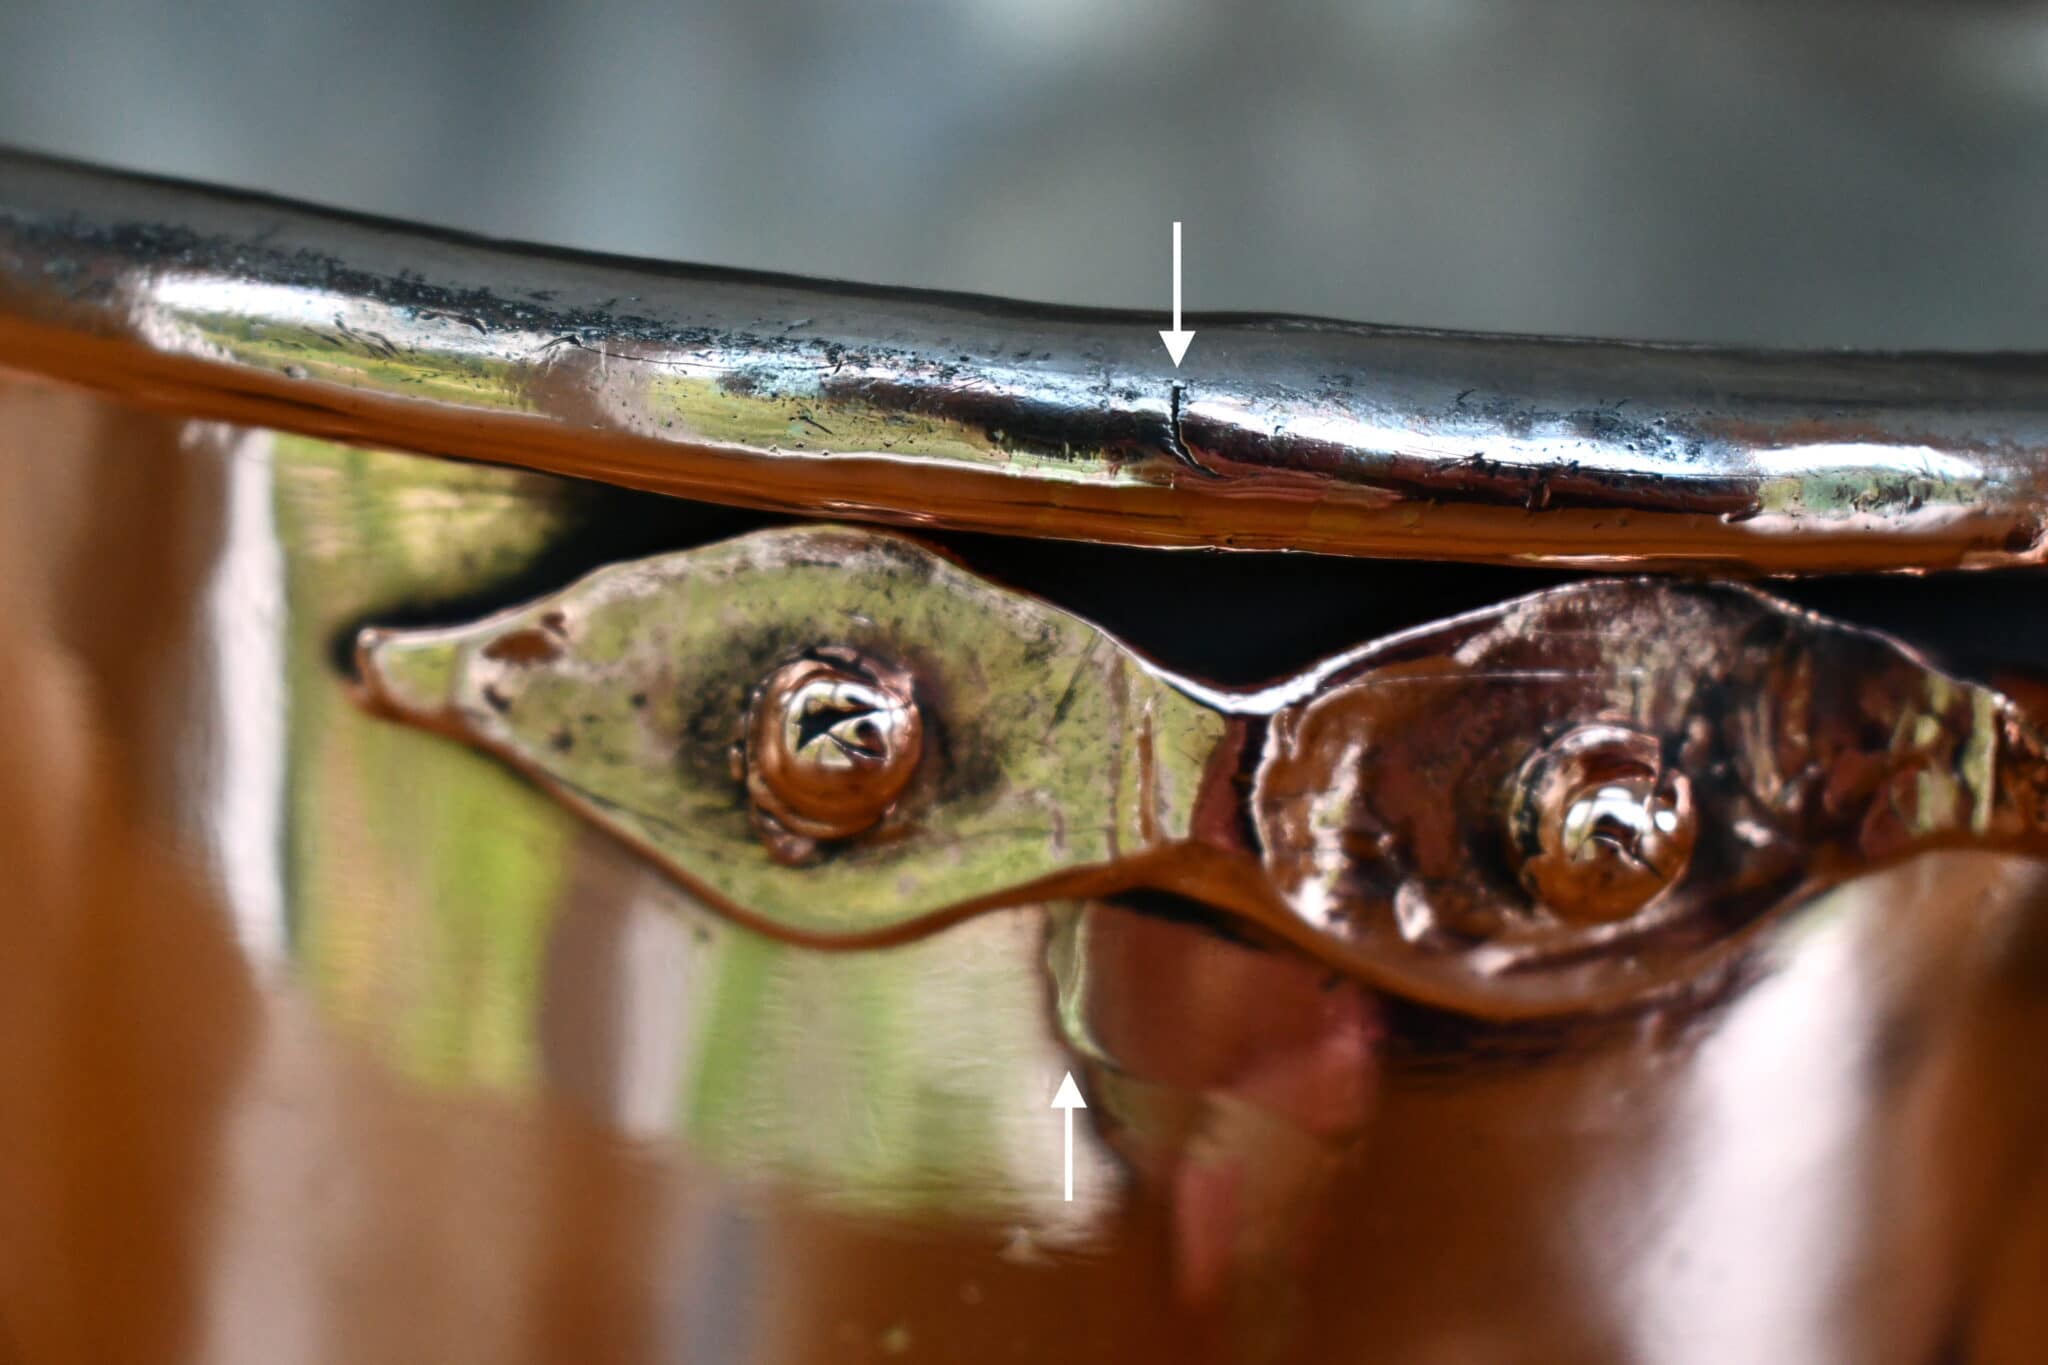
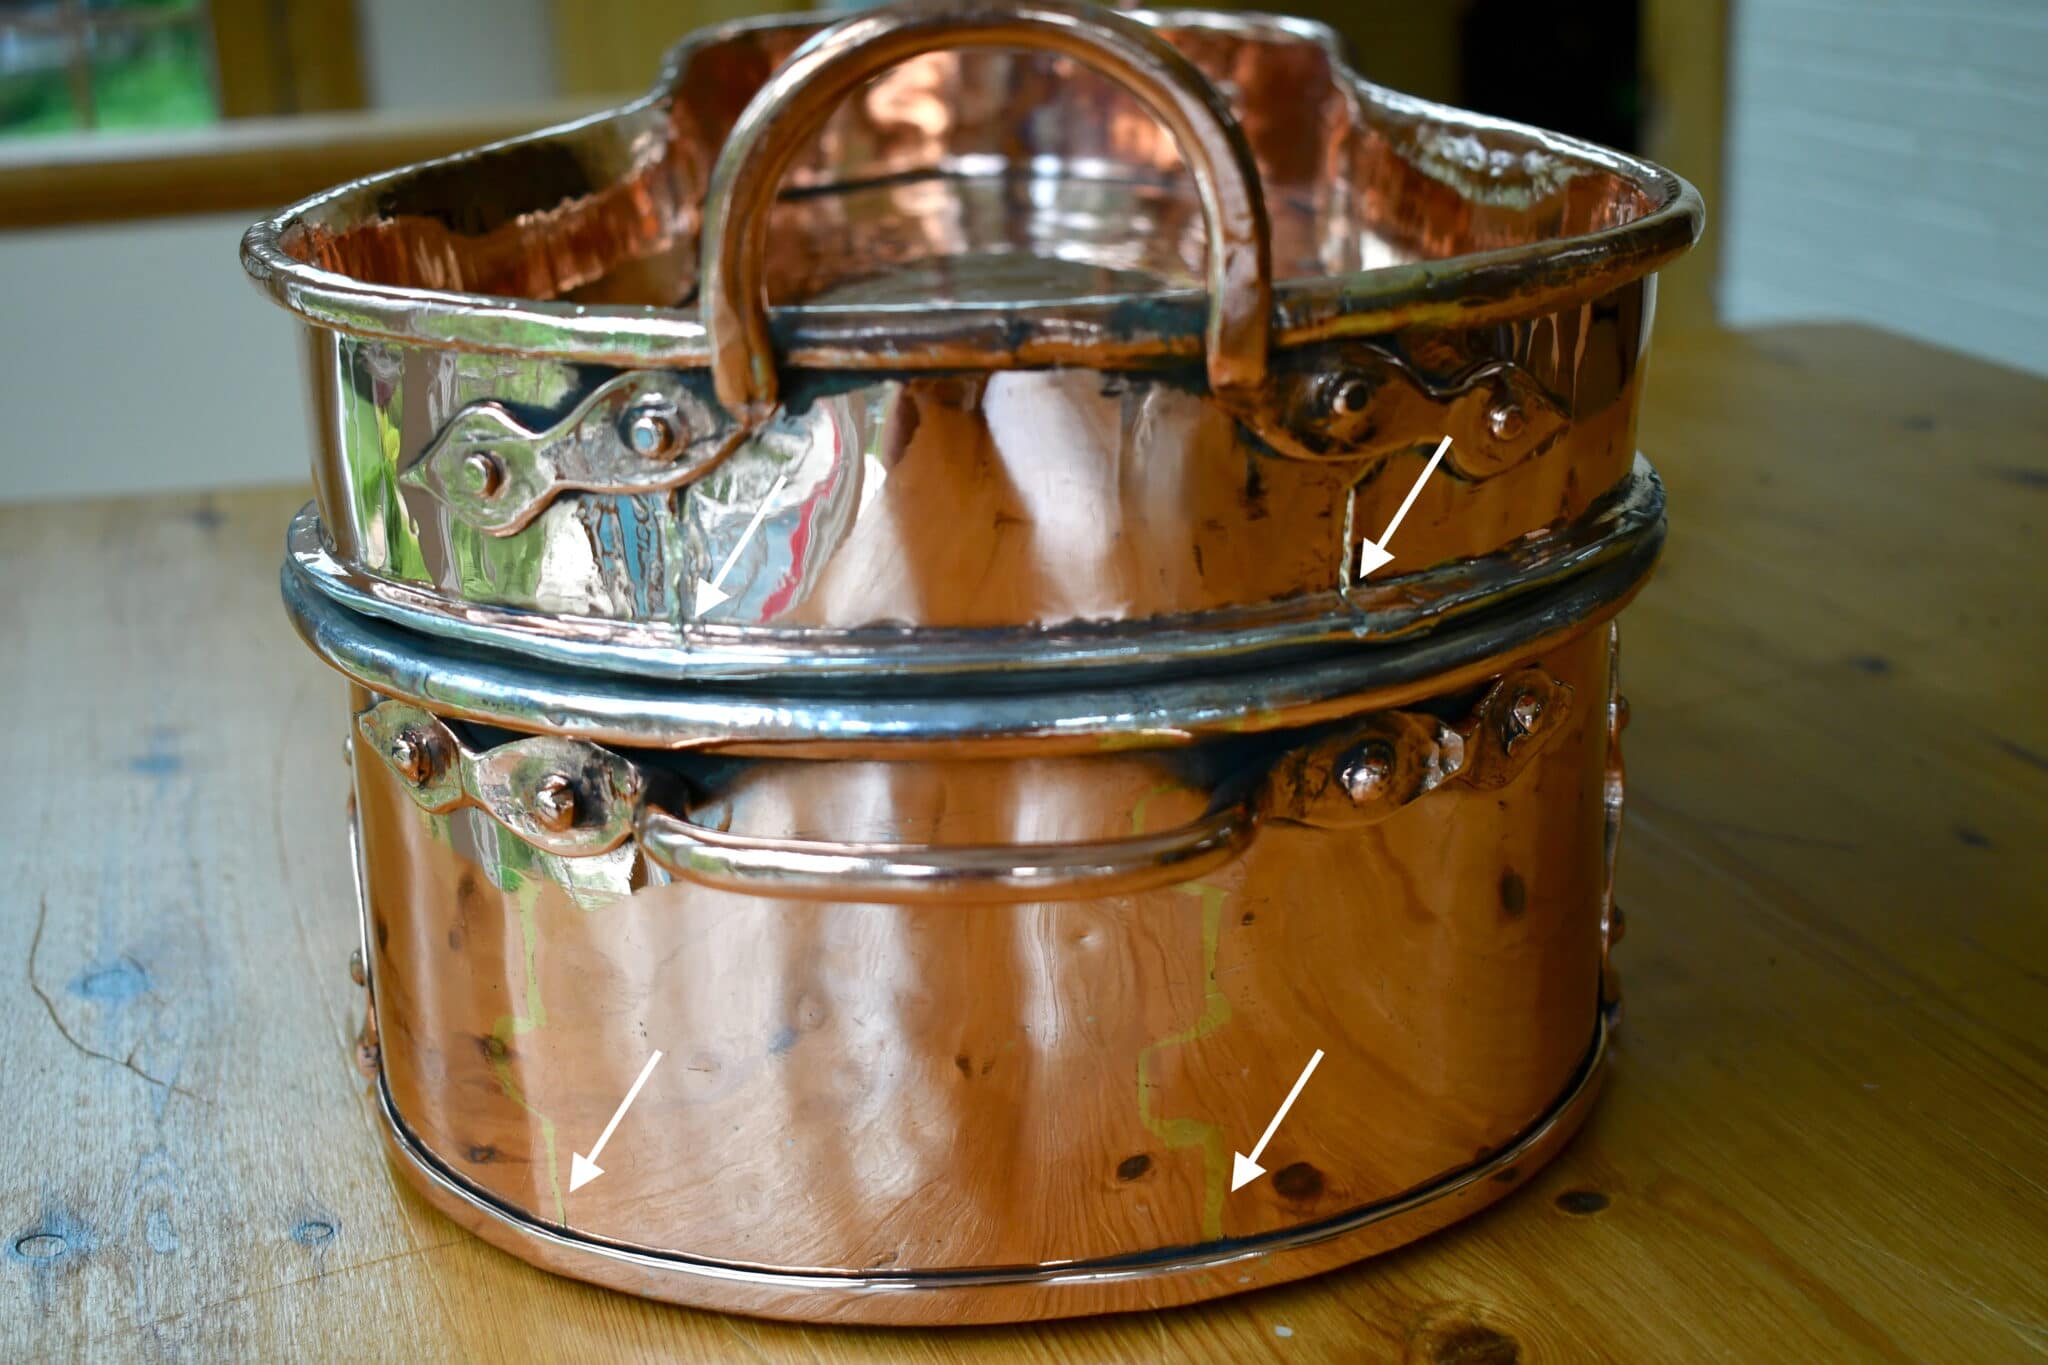
The sidewalls consist of two strips of copper: a long piece measuring approximately 128cm (50.4 inches) and a second short piece that spans the remaining 20cm of the circumference. The two pieces are joined at the wide end of the base with two vertical dovetail seams indicated by the arrows in the photo below on the left. Why use two pieces for the sidewalls? My theory is that the smith didn’t have a single piece long enough for the entire 148cm of the piece’s circumference, and he had to bridge the remaining distance with a second piece.
The dovetails extend all the way over the edge of the rim (as indicated by the arrow in the photo on the right), and the handle brackets span both joins. The handles are copper rods hammered flat at each end to create brackets to be riveted to the body.
The upper edge of the base is a rolled rim, one of two in this piece. The smith cut a thin rod of iron as long as the circumference of the piece, bent it into the correct shape, and then curled the copper over and around the iron ring to hold it in place. A rolled rim creates a rigid form that helps the copper to keep its shape, and enables smiths to use thin copper sheet (under 2mm thickness) for pieces that don’t need to be made of thick copper to serve their cooking purpose. Examples of pieces where rolled rims are appropriate (in my opinion) are mixing bowls, fish poaching pans, and, yes, antique braising pans like this jambonnière.
While the sidewall construction employs a dovetail join, the sidewall and base are joined by a different technique. A raised strip runs completely around the perimeter of the base and I assess this is where a few millimeters of the base piece and the sidewall are folded together and compressed. I believe this is a crimp seam, illustrated in the sketch below at right provided by reader Leo (originally in the discussion of this 18cm saucepan).
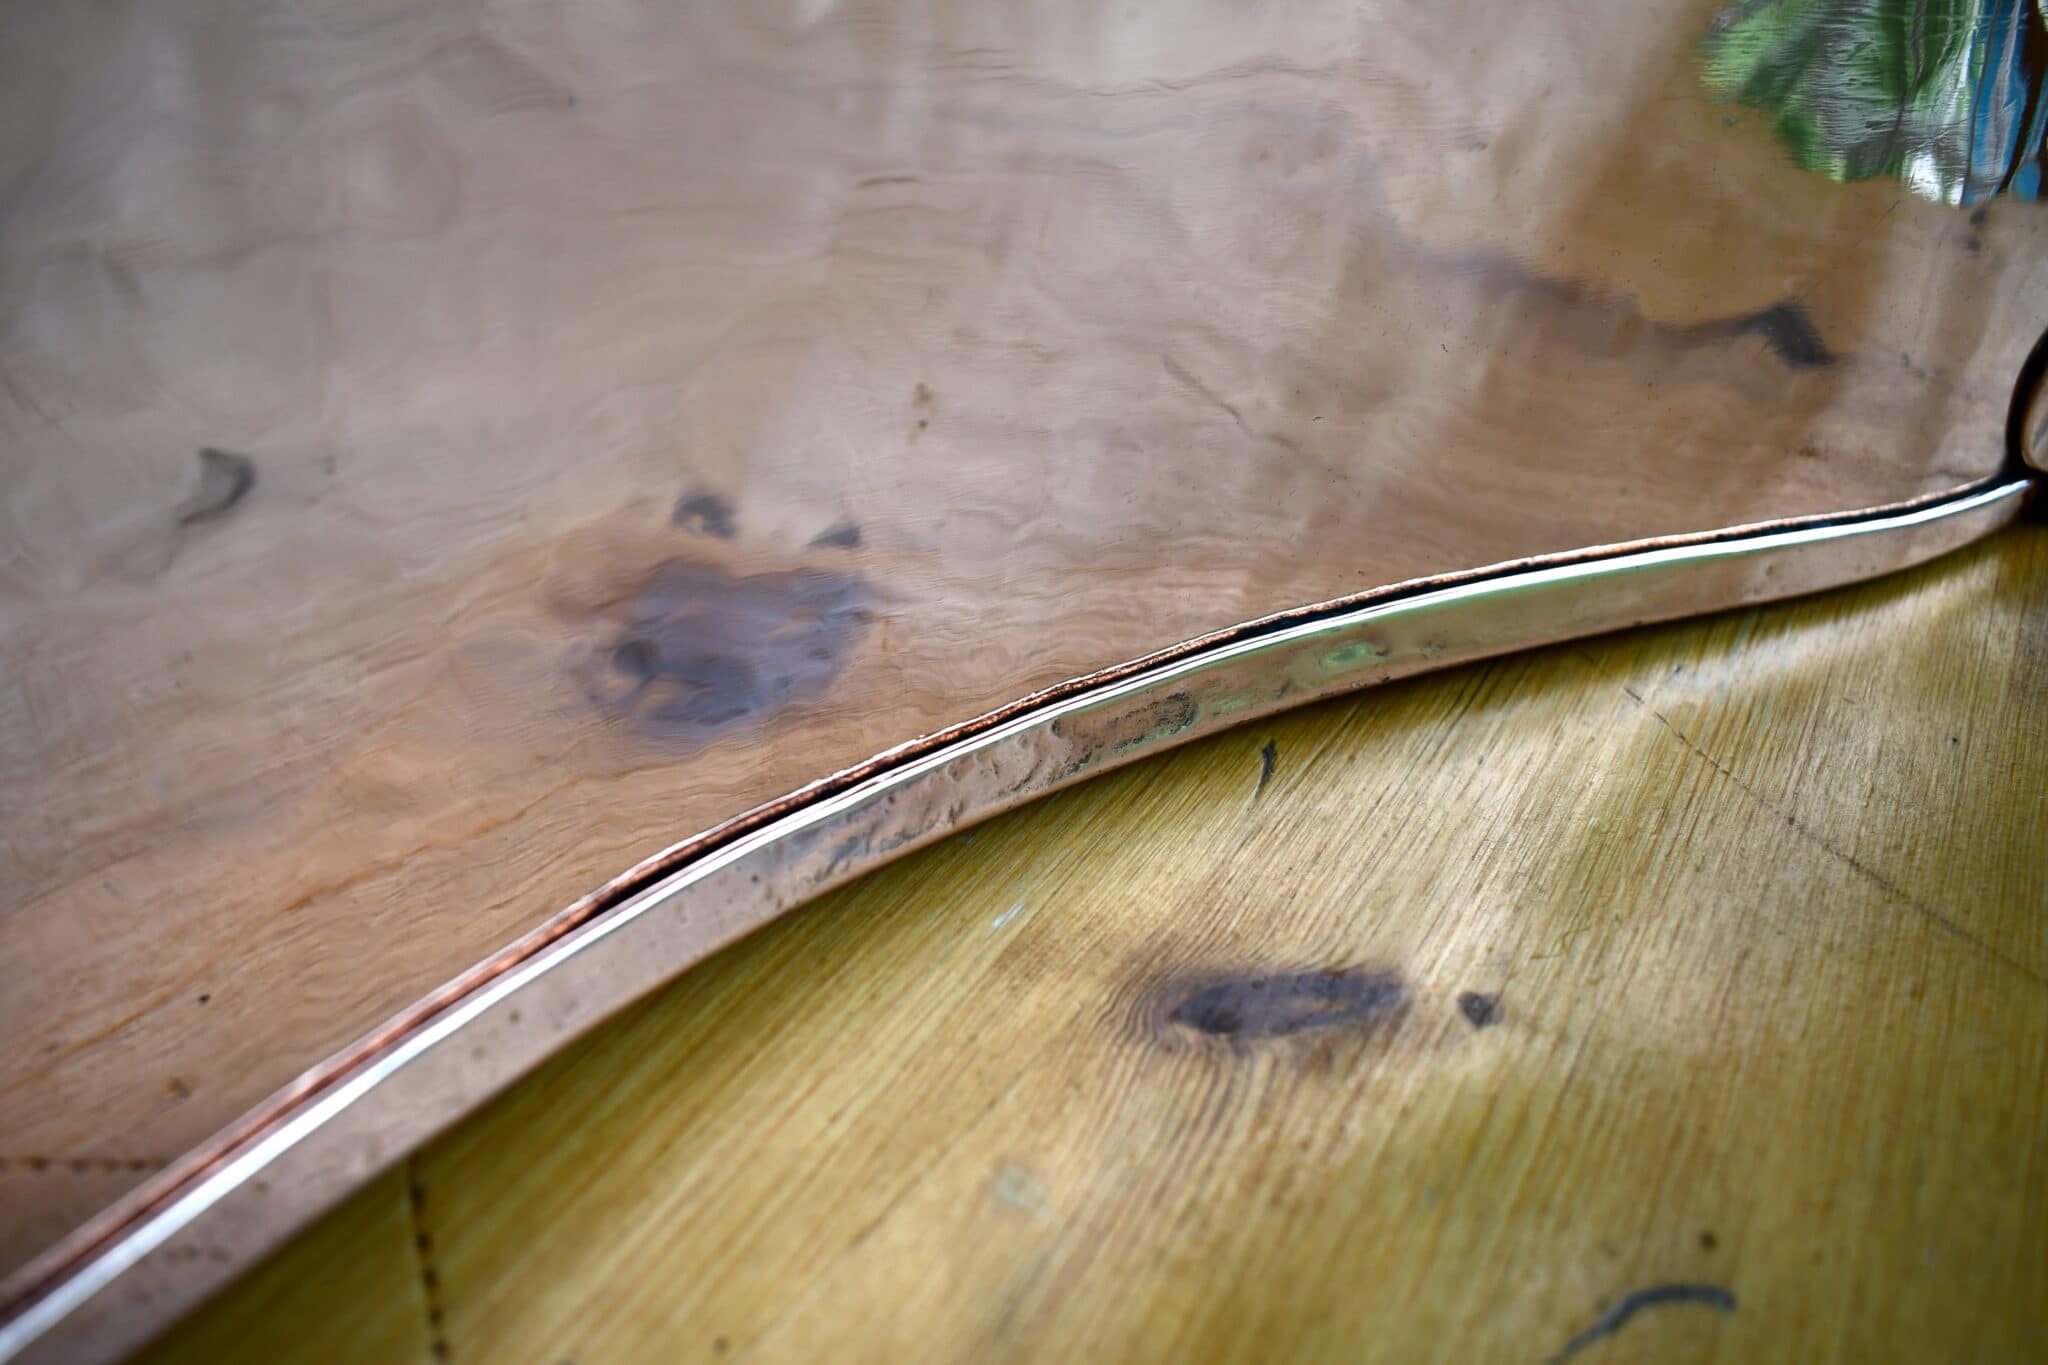

The work is beautifully done. The interior of the pan shows the nice tight seam where the sidewall meets the base. I would expect this to function as a perfectly watertight join. (I also suspect that this crimp seam with its folds of copper adds a little more structural reinforcement to the base.)

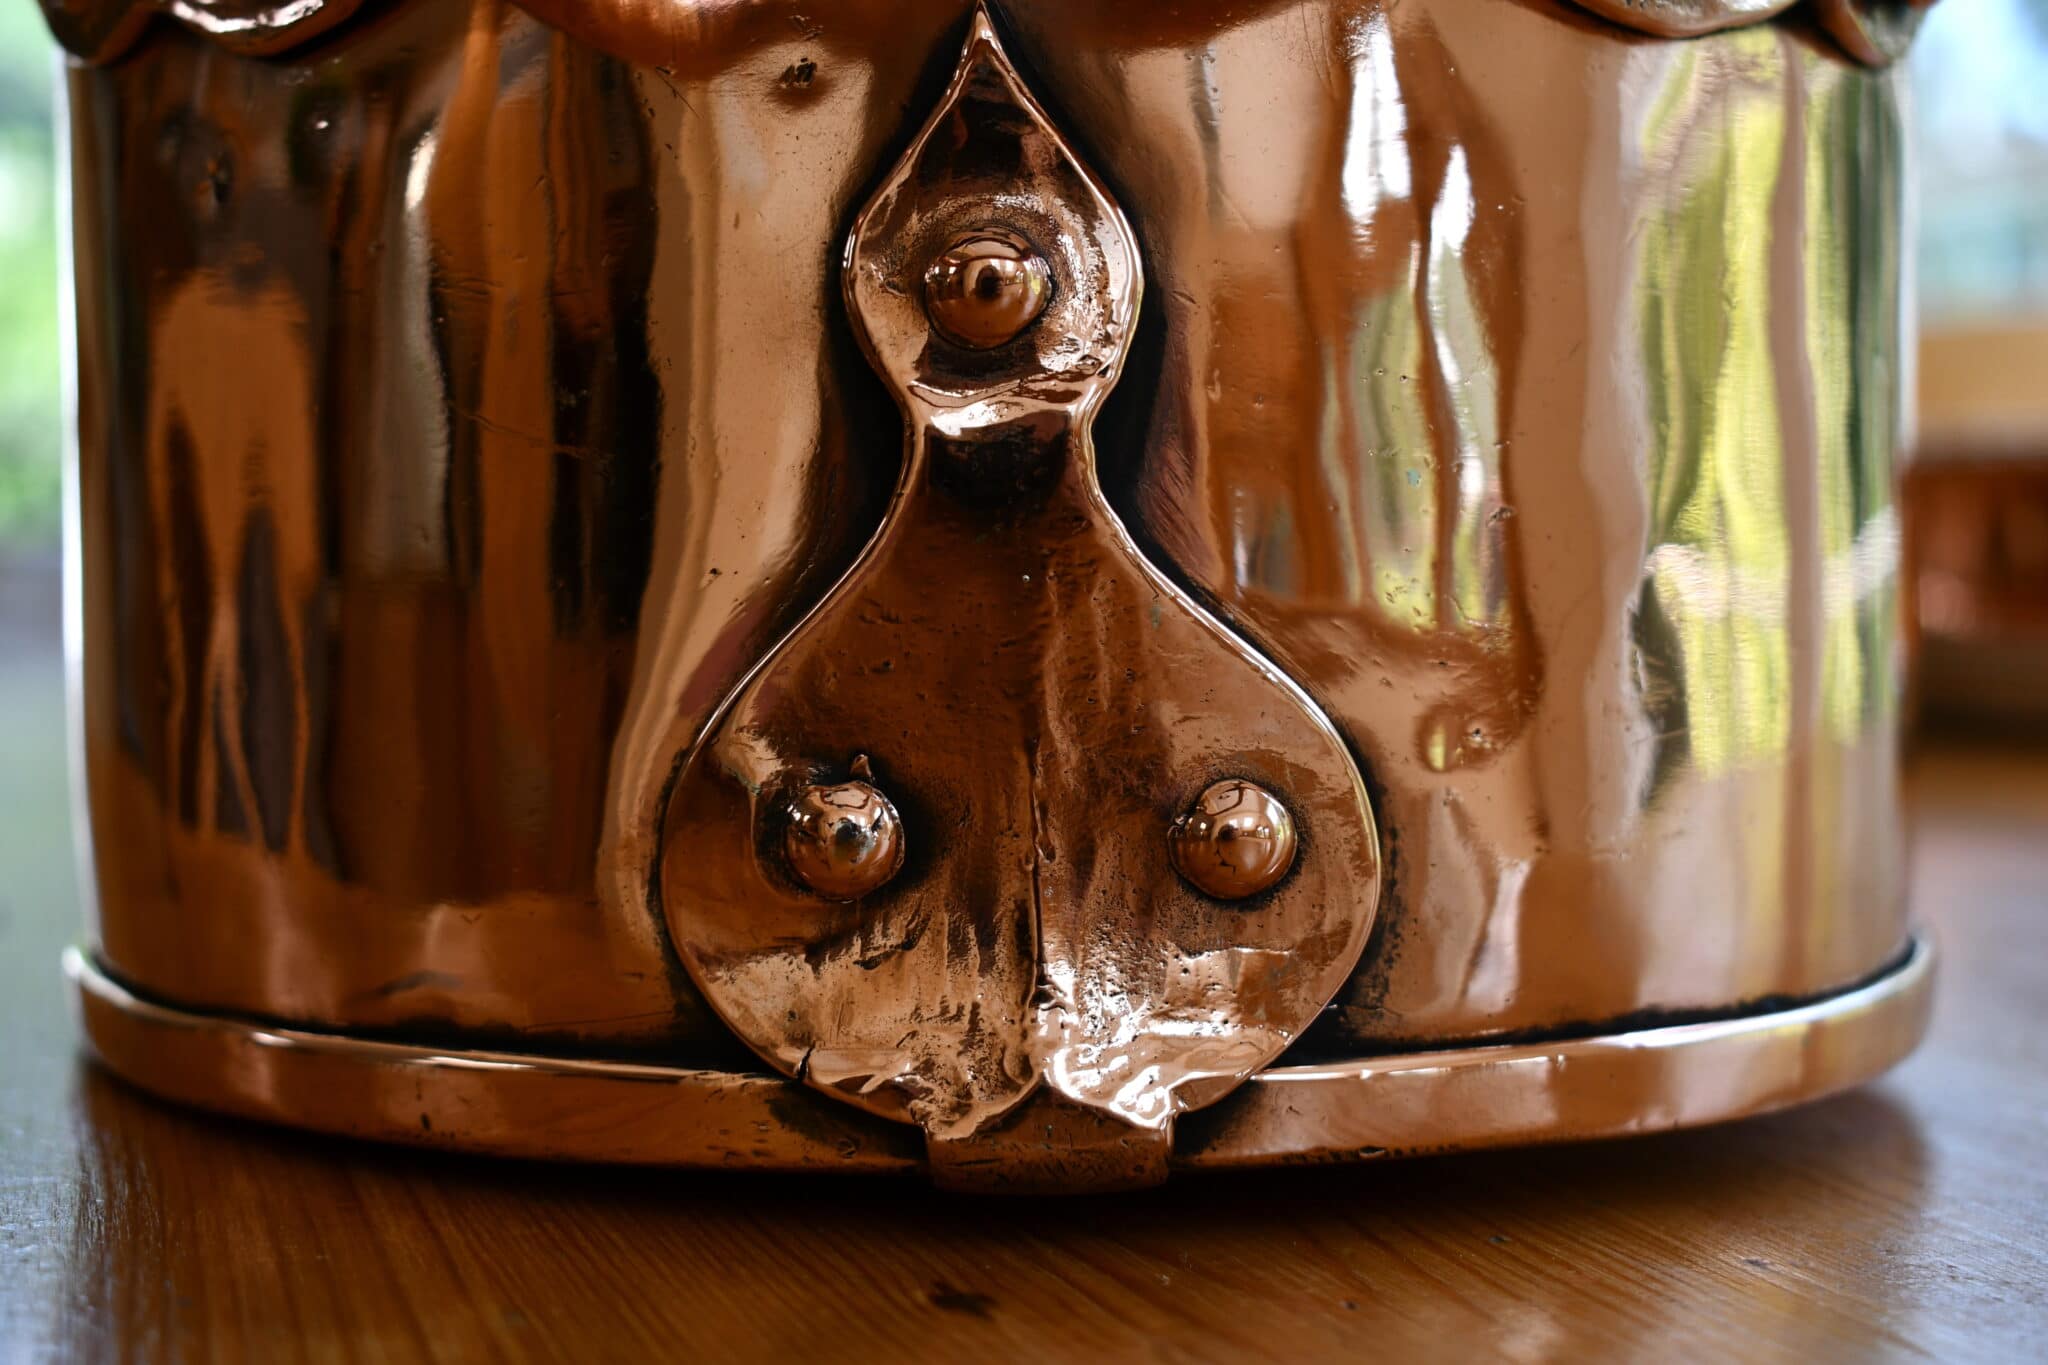
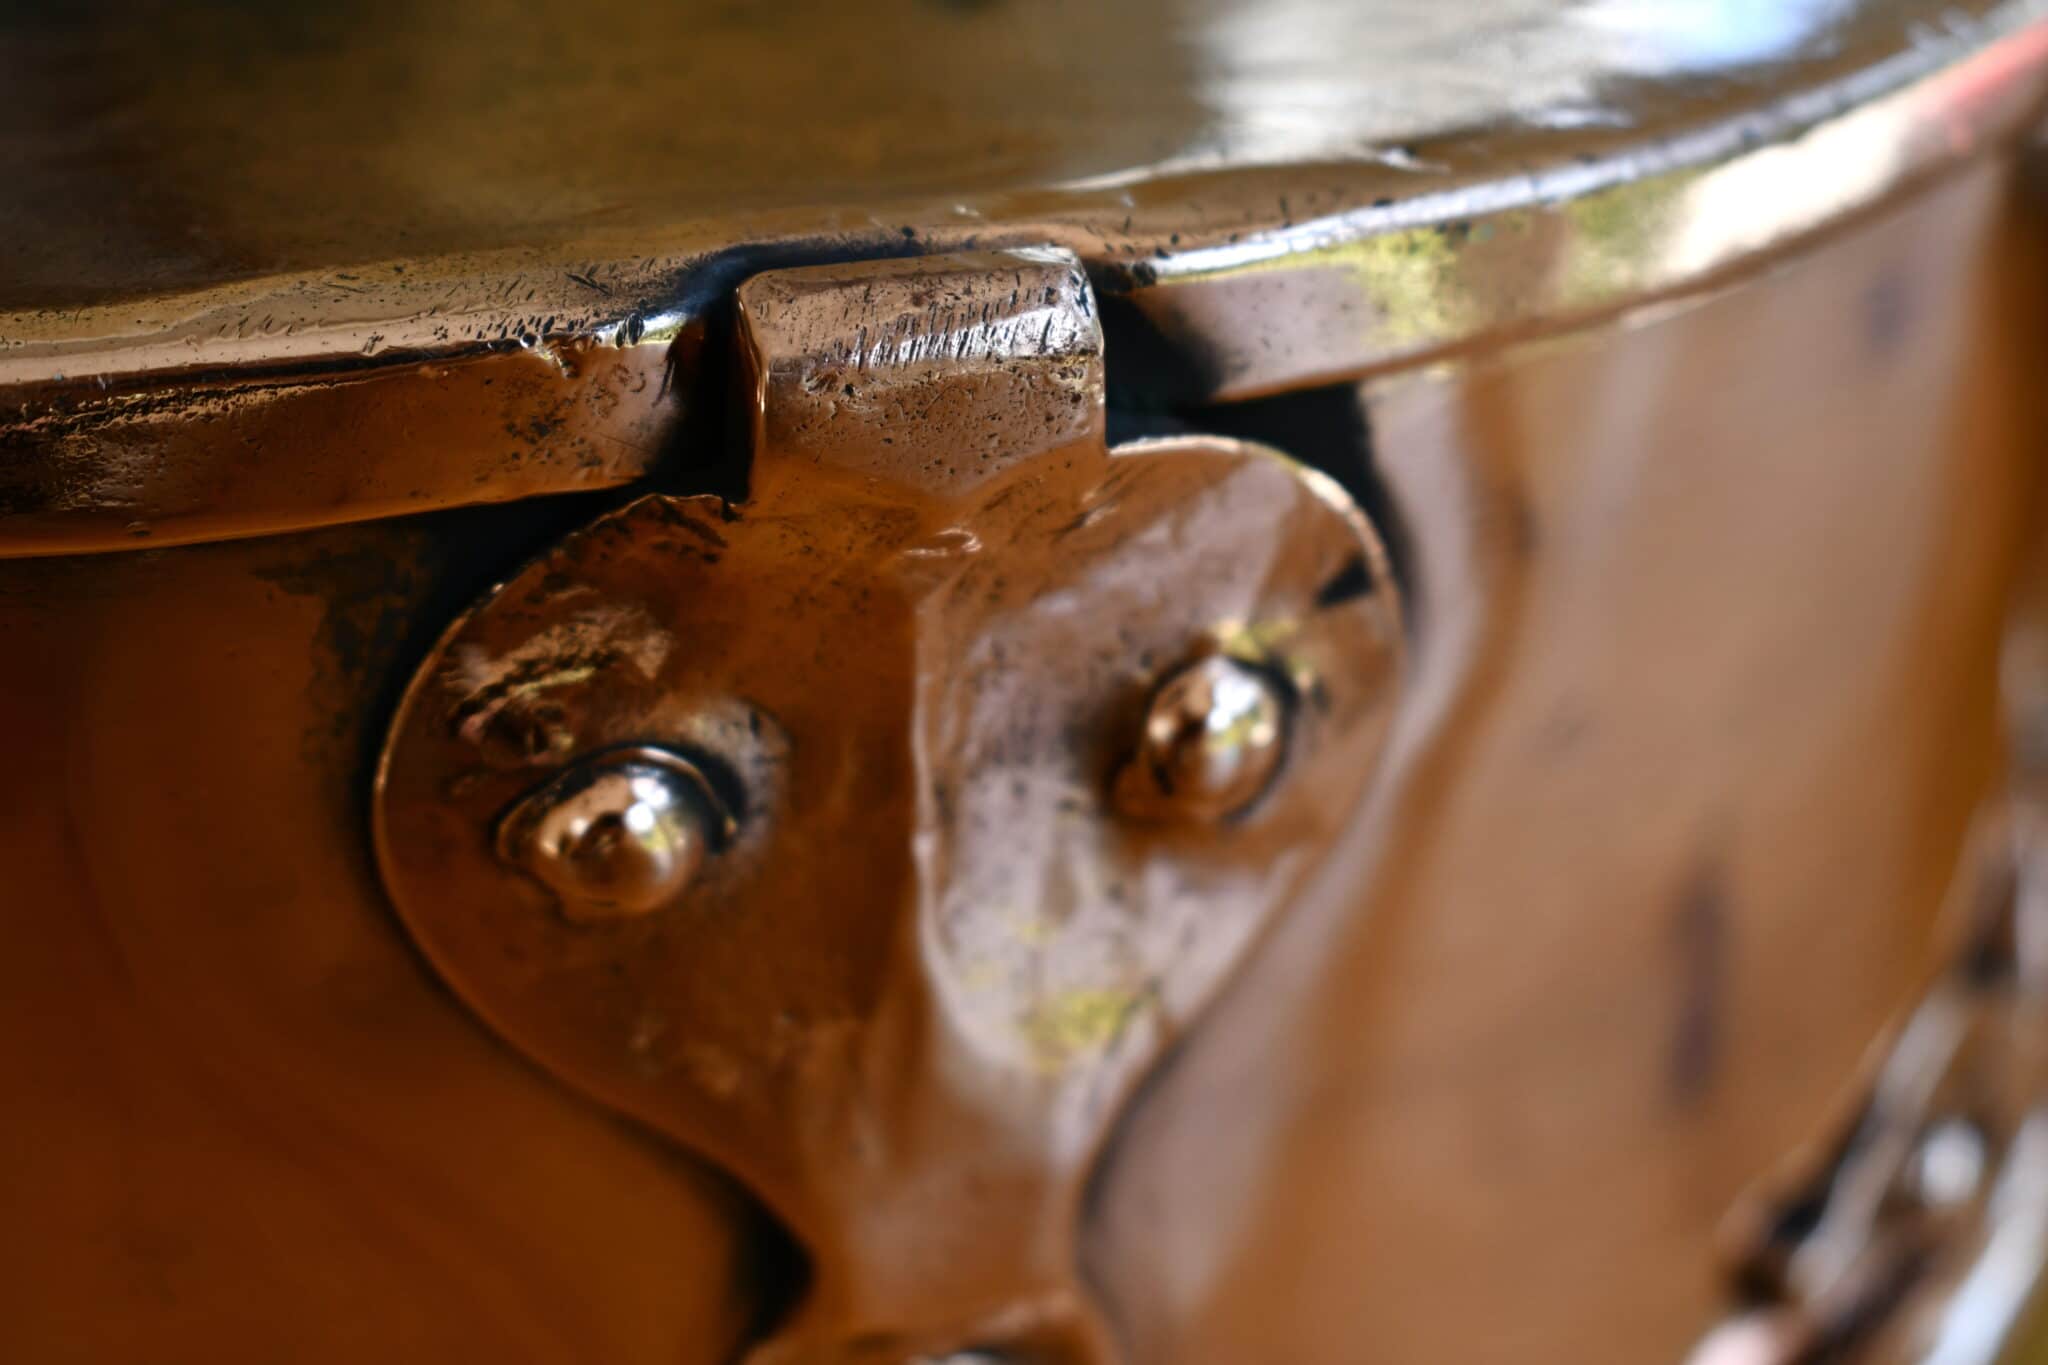
The base has three spade-shaped pieces of copper attached to the sidewalls at the two widest points and at the narrow end. I suspect these originally extended below the floor of the pan to suspend it a few centimeters above the ground; at this time each appears to have been clipped off at the base and then smoothed down.
And now to the lid, which is a magnificent piece of work.

Set on a table, the lid measures approximately 8cm (6 inches) to its upper rim. However, the bottom 2cm (.75 inch) slides within the rim of the base piece so the effective additional height is 6cm (2.4 inches) for a total height of 18cm (7.1 inches) when pan and lid are fully assembled.
When atop the pan, the lid rests on a projecting flange about .5cm (.25 inch) wide. (Note that the area below the projecting flange is tinned — this area of the lid would be exposed to moisture from the interior of the pan.)

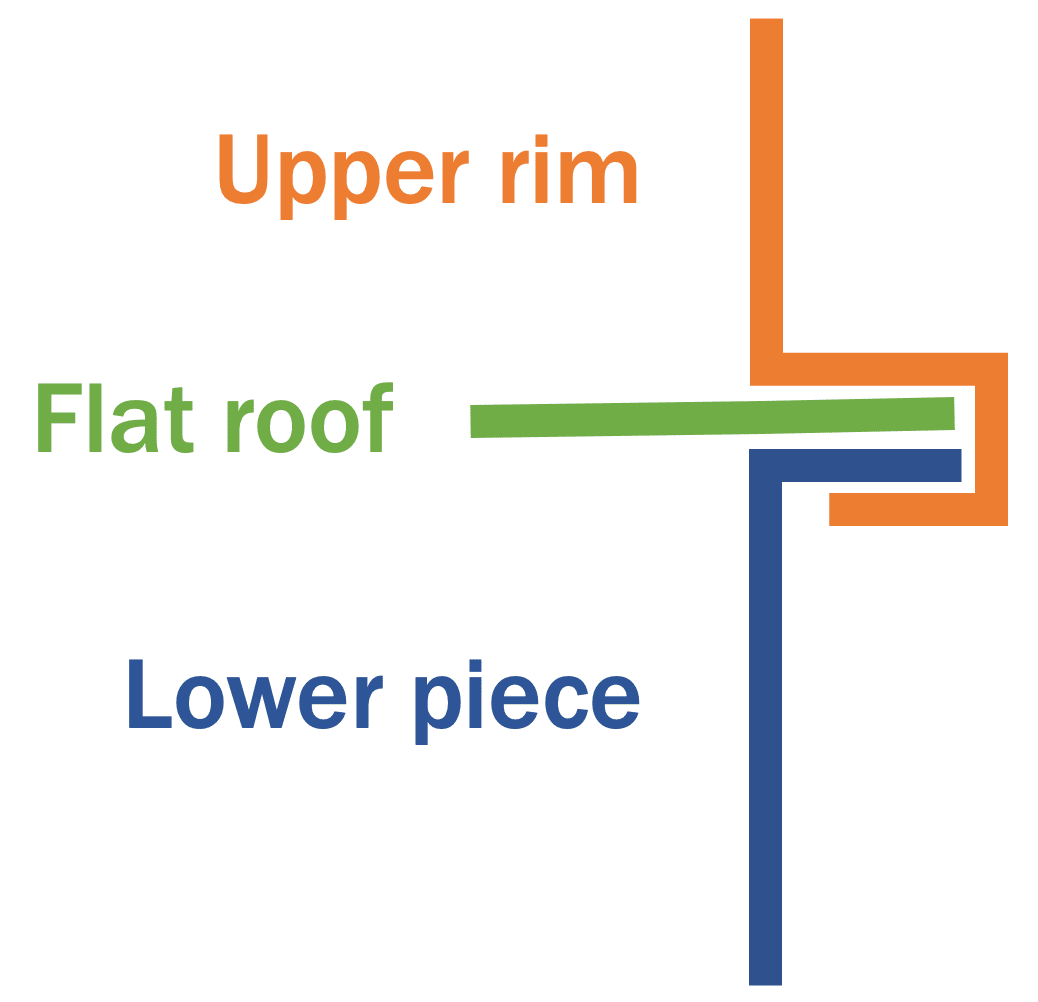 I believe the piece is assembled from four pieces: a flat piece forming the roof of the lid; a slender strip forming the lower 2cm that slides within the rim of the base; and two strips that form the raised rim, one about 128cm and the other about 20cm (similar to the sidewall strips).
The projecting .5cm lip is where the lower piece, the flat roof, and the upper rim pieces are folded together. My examination of the lip suggests that the pieces are combined as shown on the right. A few millimeters of the lower piece are bent at a right angle to meet the roof, and then the upper rim is wrapped around them both to clamp all three pieces together.
With the lid placed atop the base, you can see that the dovetails on both base and lid are spaced about the same but are not perfectly aligned. The lid handle is the same style as the base handle: a copper rod was bent and flattened at each end to create mounting brackets. As with the lid and base dovetails, the lid and base handles do not quite line up.
(I mention this asymmetry not to detract from the piece’s beauty but instead to underscore that it is completely hand-crafted and utterly unique.)
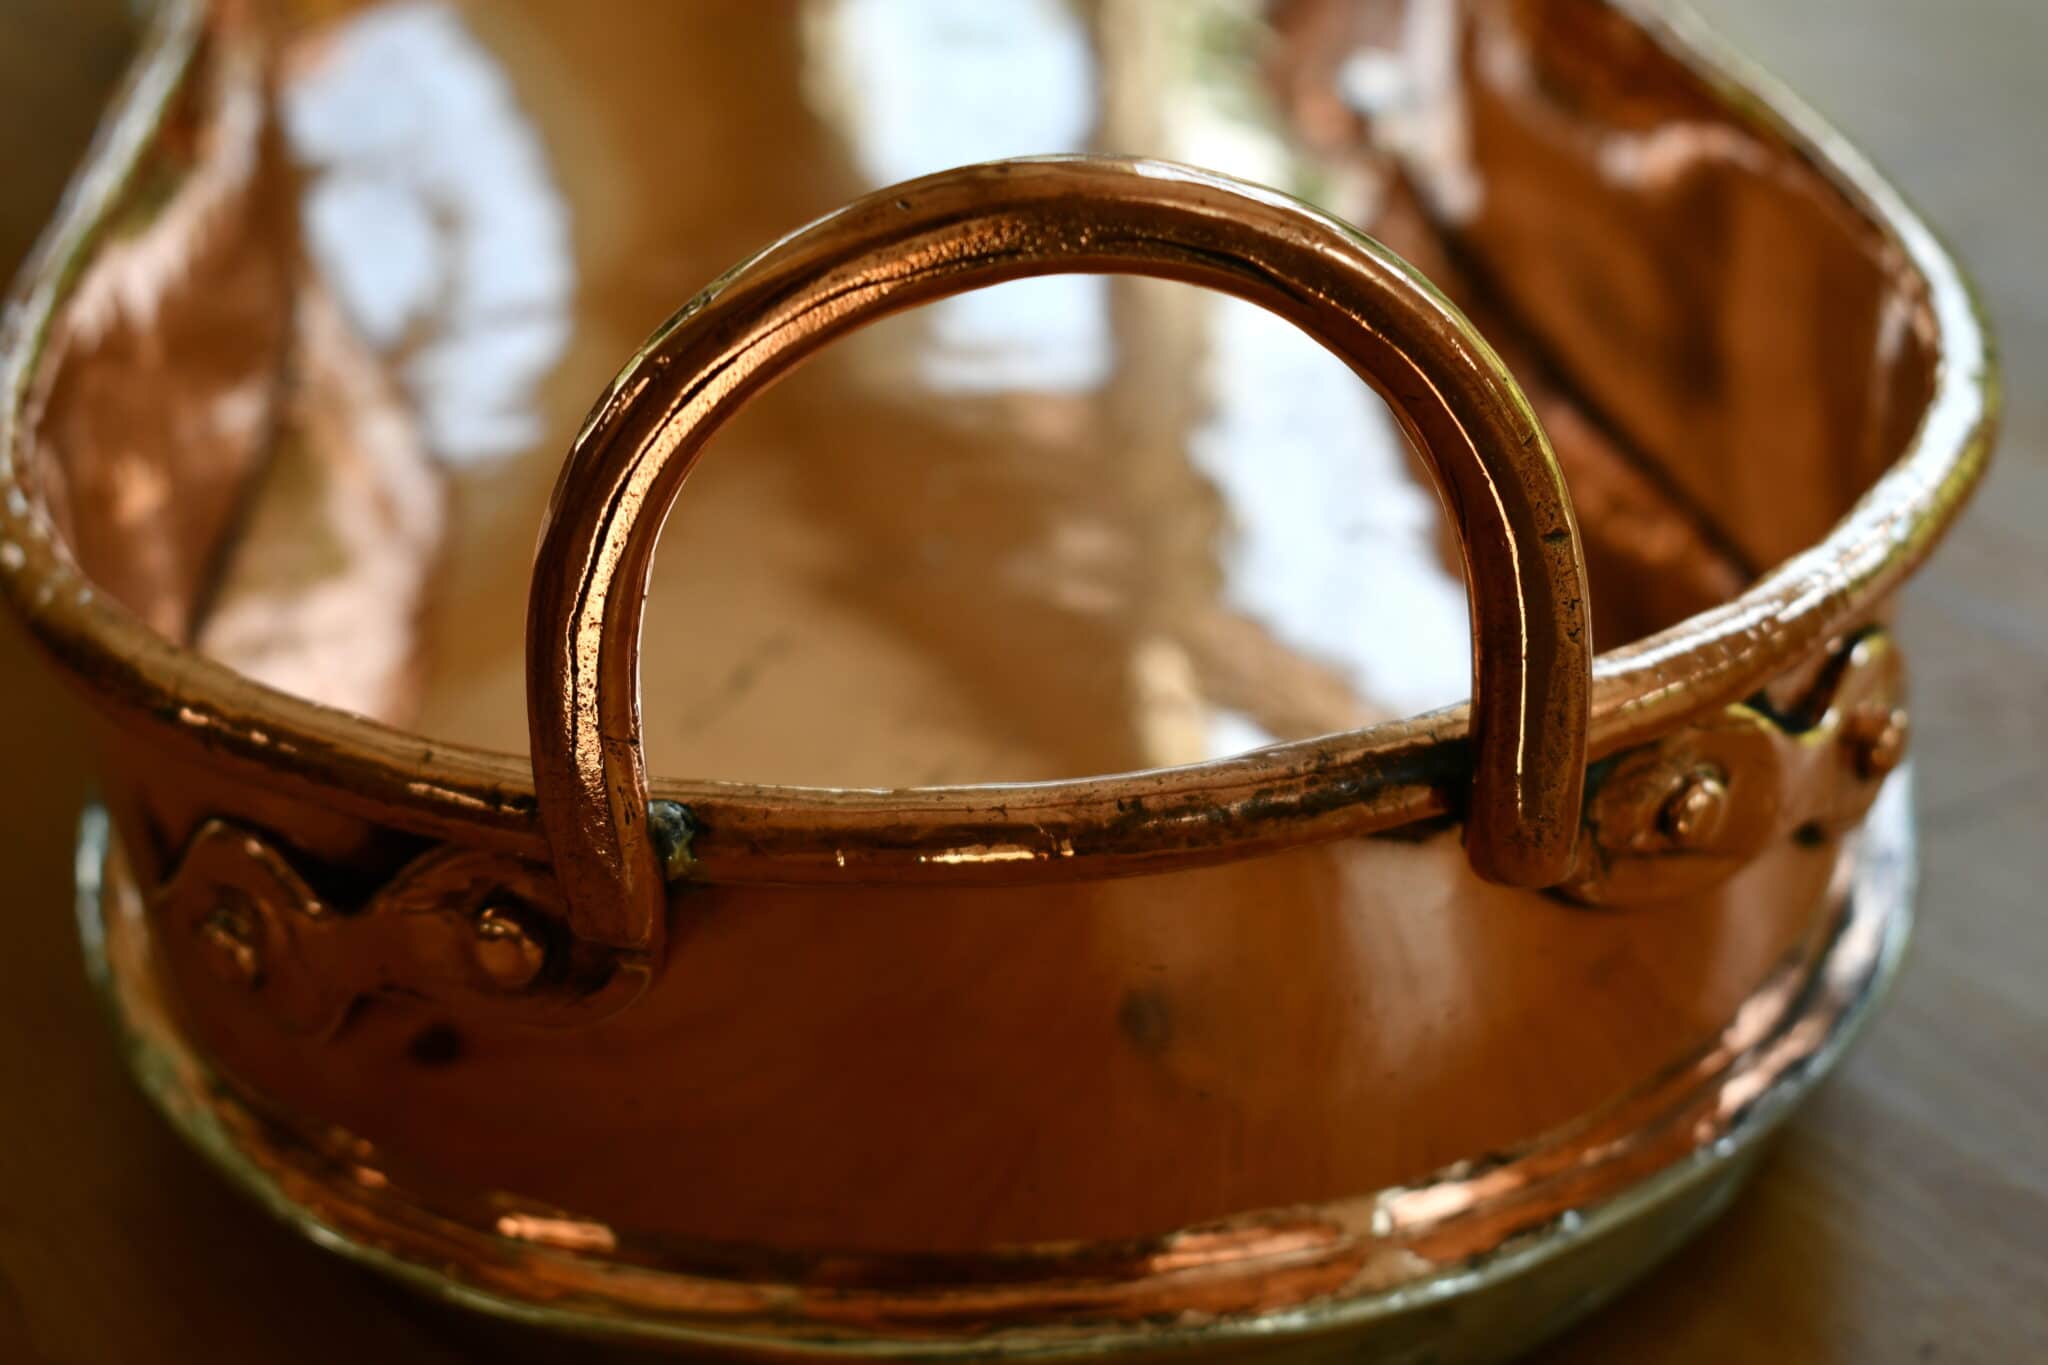
The upper edge of the lid has a rolled rim like that on the base. Below is the narrow end of the lid showing the vertical lid handle. You can see a seam running along the curve of the handle — I think it was formed by rolling a flat copper sheet into a slender rod.
I think this is one of the most beautiful and interesting pieces of copper I have ever seen.
There are no markings on this piece and I have no information as to its provenance. But its (clipped-off) feet and raised rim are intended for use with hot coals as a heat source, and my assessment is that it is a 19th century piece, mid-century if not earlier.
Now, what to cook in it? Time for some kitchen history.
Coming into the 19th century, French kitchens had three ways to cook food: the âtre (hearth), the potager (masonry cooktop), and the four (oven).
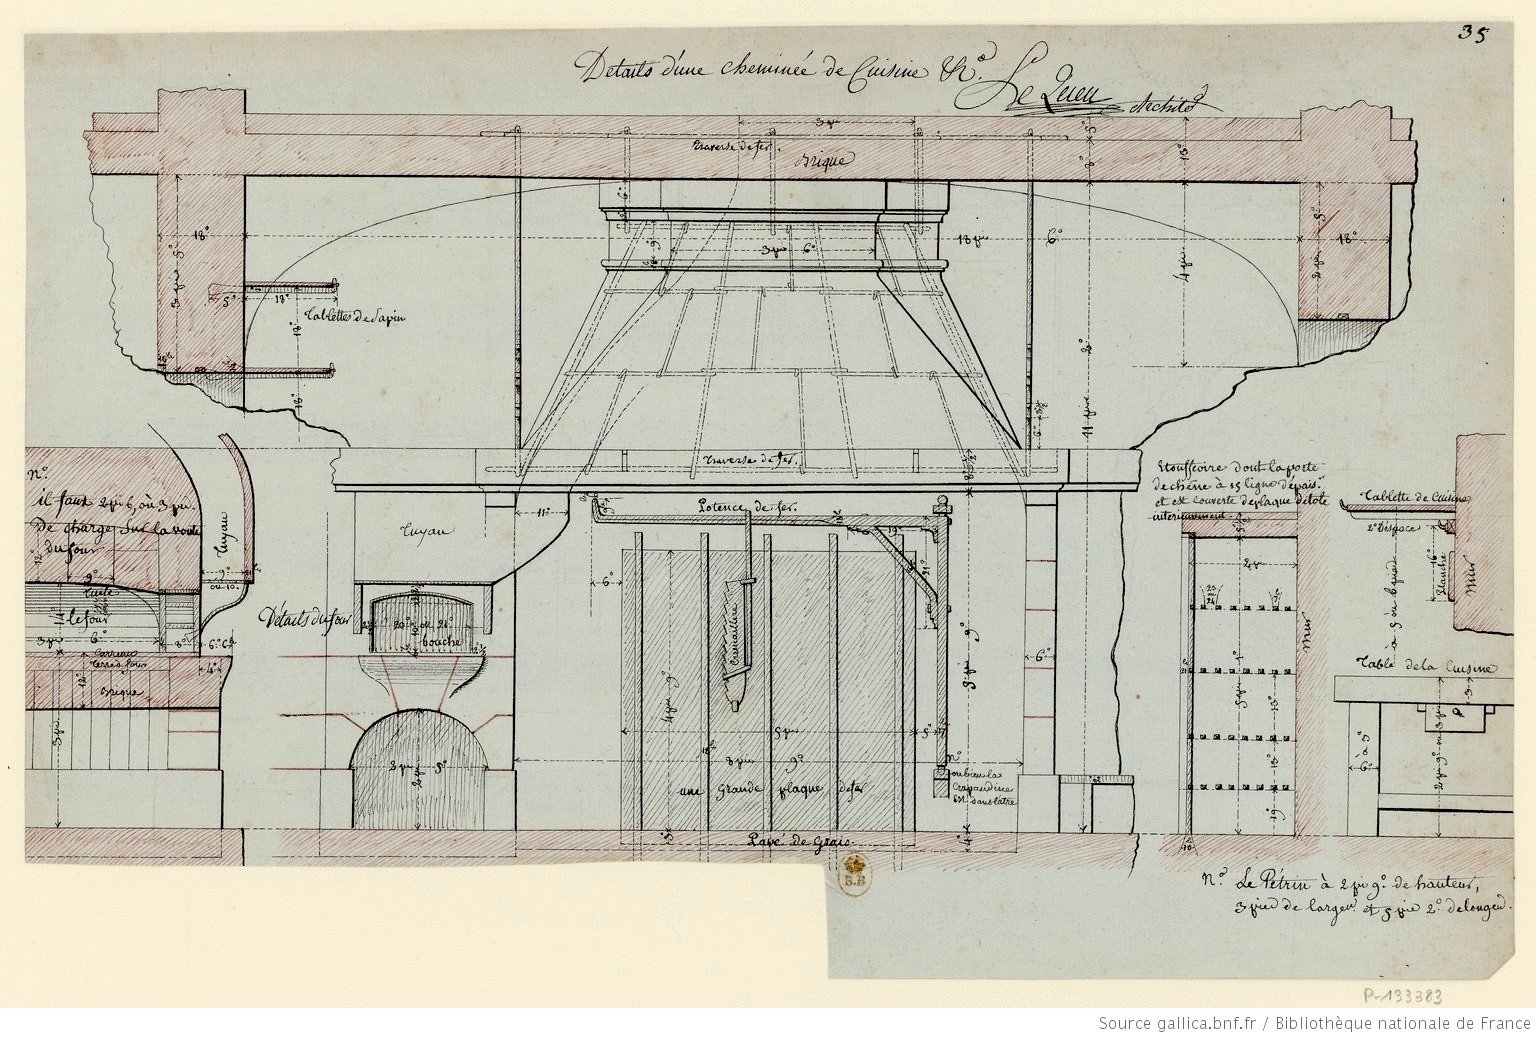
Below is a design by architect Jean-Jacques Le Queu in 1786 for a gorgeous cheminée de cuisine. This is an archetypal âtre for heating and cooking. A large potence de fer — literally, iron gallows — pivoted over the flames. The jagged cremaillere (rack) could be slid back and forth as well as incrementally raised and lowered to control the heat reaching a pot or cauldron hanging from it. To the left of the fireplace opening is a small four heated by a wood-burning chamber below, vented by a tuyau (pipe) to the main chimney. (Note that the measurements are in pieds and pouces, feet and inches — the metric system would not be adopted in France until 1795.)
Next to the hearth would be a masonry cooktop called a potager, sometimes also called a fourneau. This was a waist-high brick-and-mortar platform with a series of shallow recessed iron grills across the surface. Hot coals from the main kitchen fire were brought over and placed into each grill as needed; the ashes fell down into a lower compartment to be shoveled out. Pots were set directly on the masonry across the grill opening or on an iron stand. (I suppose that if the pot or pan had feet, like my jambonnière originally had, you could feed the coals on the grill below without disturbing it.)
Below is Le Queu’s design for a fourneau, also drawn in 1786. This is an impressive setup for a large professional kitchen — imagine how many pots of different shapes and sizes could be kept going at the same time. (Those long rectangular grills would be perfect for a poissonière.)

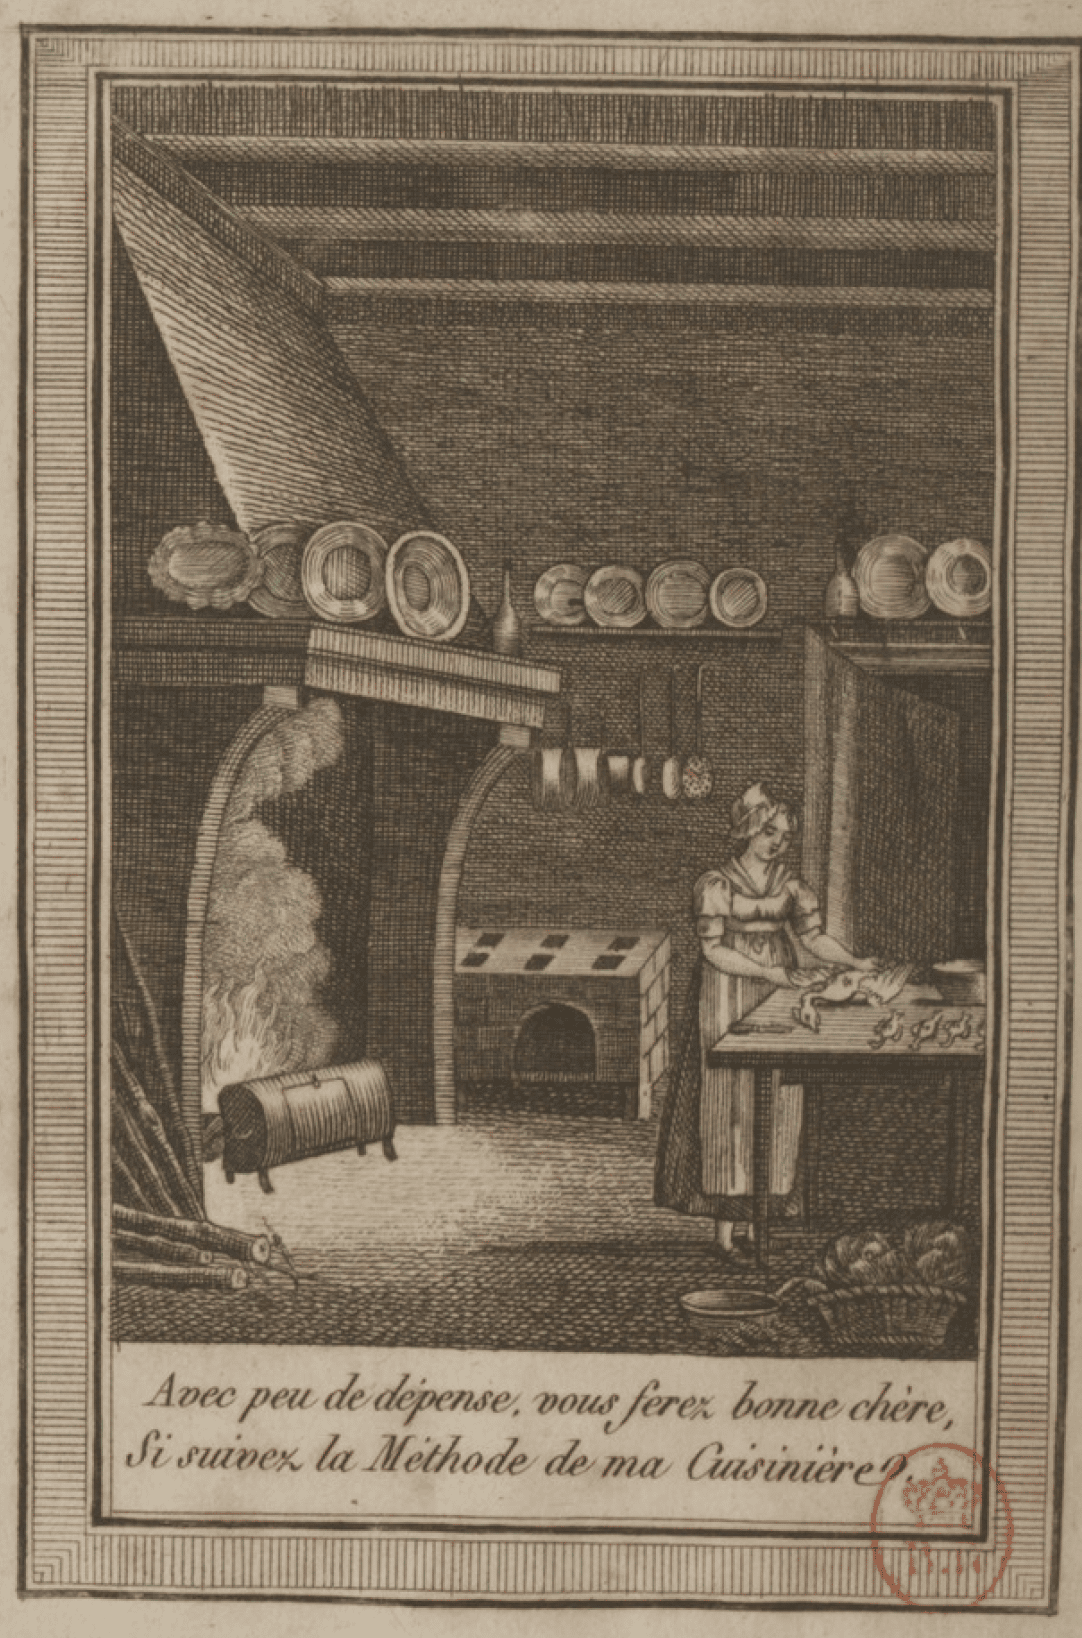
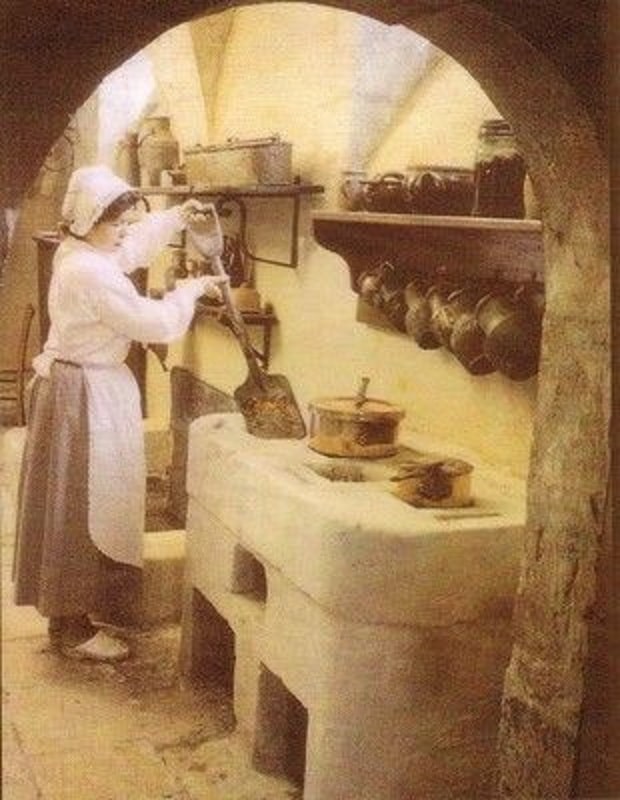
Of course, the two designs above are for very grand kitchens; a conventional household would have an âtre, potager, and perhaps a four on a smaller scale. Below on the left is a woodcut from the frontispiece for La nouvelle cuisinière bourgeoise, dated 1816, showing a more modest kitchen. The cook is plucking a goose at the worktable; behind her is the âtre and against the back wall is a potager with six visible cooking pits. (That oblong object in front of the âtre is a free-standing rotisserie.) On the right is a four-grill potager in action — the cook is shoveling hot embers into one of the grills while two more pots are cooking along. The image is undated and could be a historical recreation, but I wouldn’t be surprised if it’s an early colorized photograph of the real thing.
Recipes in the 19th century tend not to specify âtre, potager, fourneau, or four but instead the size of the fire: feu grand (“large fire”), feu assez vif (“fairly lively”), feu moderé (“moderate”), petit feu (“small”), feu doux (“gentle”). For many recipes, and for all the braises, the instructions are to create feu dessus et dessous (“fire above and below”) by piling cendres (cinders), braises (embers), or charbons (coals) onto the lid of the pan.
The most obvious recipe for my jambonnière would be for jambon, a leg of ham. These recipes all start with a multi-day process of cold-water soaking the entire ham to extract the preserving salt followed by hours of boiling to cook it completely. (French chefs in the 19th century were well aware of the dangers of under-cooked pork.) The result is jambon au naturel — a lightly seasoned ham that can be presented as-is or cooked a second time with additional flavorings for variety.
I think my jambonniere was intended for this secondary cooking. It’s not deep enough to immerse an entire ham for a multi-day soak followed by hours of boiling — you’d need a large marmite for that. Instead, I believe this jambonniere is intended for a finishing braise of an already thoroughly cooked jambon au naturel, low and slow to keep the meat from overcooking and drying out.
One of the most common secondary recipes is for jambon aux épinards, ham in wine sauce paired with spinach. The recipe below from the 1835 edition of Le nouveau cuisinier royal can’t be attributed to any single person; the book is an agglomeration of recipes from many sources going back to the 1700s and jambon aux épinards appears in almost every 19th century cookbook I studied. Think of the recipe below as an exemplar of one of the most common ways to present ham at the table.
The ham being cooked au naturel, slice and brown carrots, onions, parsley, garlic, thyme, and bay leaf in butter; moisten everything with white wine and broth, and when the root vegetables are almost cooked, pass your cooking stock through a sieve; put your ham in it and cook it over low heat for two hours, with fire above and below. Prepare, on the other hand, spinach leaves; blanch them, toss them in butter, and moisten them with a little of the stock from your cooking, perhaps a little sauce espagnole [Spanish sauce]; add a little nutmeg, salt and coarse pepper; then prepare your spinach, place your ham on it, and glaze it.
Le nouveau cuisinier royal, 1835
ed. M. Beauvillers
Antoine Beauvilliers (1754-1817) presents a variant in L’art du cuisinier, published in 1814. This recipe combines elements of jambon au naturel and jambon aux épinards into a single process to soak a salted ham and then cook it in a long braise. (Note the careful instructions to test the meat with a larding needle to make sure it’s thoroughly cooked.) What’s interesting to me here is the direction to take off the lid of the braising pan halfway through the cooking to reduce and intensify the sauce.
Take a ham and pare away the under part; cut off l’os de quasi [the end of the aitchbone or rump bone], and pare off the yellow lard; bone it without injuring the ham; dessalez it, that is to say, soak it to take out the salt [and test its readiness by inserting a larding needle and tasting the saltiness of the flesh]; tie it up in a linen cloth, and put it into a braisière of a size to fit it, after having added butcher’s meat, beef and veal, with onions, carrots, a bunch of parsley and spring onions, two or three cloves, three bay leaves, thyme, and basil; moisten it with water, let it cook [at low heat for four to five hours] and when about half done, put in a bottle of Madeira; if you don’t have this wine, add a glass of brandy and a bottle of Champagne; now leave the cover of the braisière off, that the seasonings may reduce; sound it, to judge if it is cooked [by sticking the larding needle within, and if the needle inserts with no resistance, it is done]; drain and put it upon a platter; take off the skin; glaze with a veal reduction. If there is none, sift a little sugar over it, and glaze it in the oven or with a hot poker; give it a good color; serve it over spinach or such vegetables as you deem appropriate.
Antoine Beauvilliers (1754-1817)
L’art du cuisinier, 1814
I like this recipe because while it’s a little imprecise (and possibly plays a bit fast and loose with trichinosis), it also seems forgiving. No Madeira? No problem — use brandy and Champagne. No veal reduction? Hey, it happens to the best of us — just sprinkle on some sugar and pop it in the oven and nobody will know the difference. No oven? Just a minor setback — wave a red-hot poker over it and it’ll brown right up. And at the end you can send it out with spinach or whatever happens to be laying around.
That’s my kind of cooking!
But I have one hesitation about jambon in this jambonnière of mine: at 56cm (22 inches) it’s certainly long enough, but it’s just 12cm (4.7 inches) to the roof of the lid. Perhaps 19th century pigs were finer of limb than those we have today, but modern-day hams look to be almost twice as tall as my pan will accommodate. (Of course, my 50cm jambonnière ovale would be quite up to the task!)
Perhaps a better option would be gigot, leg of lamb. Jules Breteuil writing in 1860 in Le cuisinier européen provides a good representative recipe for this.
Bone a lamb; lard it with bacon fat and tie it up with a strong piece of string. Put it in the braising pot with several strips of bacon, carrots, onions, a good bouquet garni, a strong seasoning of salt and pepper, and pour over enough defatted broth so that the boneless leg is completely covered. Put in the leg bone broken into two or three pieces. First cook over a good fire; then, when it is boiling well, cover the fire with ashes, put a lid loaded with hot coals on the braising pan, and continue cooking over a low heat until the lamb is thoroughly cooked. Remove it from the heat; strain the juice; reduce it if it is too thin, and pour it over the lamb just before serving.
Jules Breteuil
Le cuisinier européen, 1860
This recipe for gigot is a little different from those for jambon, most notably in that it calls for covering the lamb in broth and bringing it to a boil. But once heated, the directions are similar as for jambon: reduce the fire and pile on the coals for a low and slow braise.
But note that even as Breteuil was writing his instructions to put charbons allumés — burning coals — in the lid of the braising pan, he was elsewhere in the same book ringing the death knell for this method of cooking.
The old kitchen fireplaces of wide mantels, with their accompaniment of open fourneaux, have disappeared or are about to disappear; we hardly find specimens of them except in a few old kitchens of rural auberges. Today, the ease of transport by canals and railways has popularized the use of coal; sheet and cast iron have fallen in price; firewood and charcoal kept going up. Those who were most repulsed by the use of charcoal as a fuel ended up getting used to it, and we now find in a large number of kitchens appliances similar to those used in Belgium from time immemorial under the name of étuves [free-standing stoves] or cuisinières… The coal, in all these ovens, being placed in such a way as never to be in contact with the dishes that are suitably heated without receiving the influence of the dust or the smoke, all the possible stews cook there simultaneously, even roasts which are perfect in the oven.
The cast iron étuves and cuisinières of which he speaks with their convenient hot plates, enclosed ovens for reliable all-around heat, and separate coal-burning compartments eliminated the need for handling hot coals. And yet Breteuil’s recipes again and again still call for the old ways: “When the roux is browned, cover the pot completely and put it under the fourneaux in hot cinders”; “put the pot on hot cinders”; “pull it off the fire before it boils, put a lid on the pot on which are charbons allumés, and pull the pot to the edge of the fourneau.” Perhaps the relentless strides of fin de siècle progress did not always proceed in a straight line.
And so we arrive at the 20th century. Auguste Colombié in his 1906 cookbook La cuisine bourgeoise lays out for us this path for the braising of a leg of lamb.
Choose a strong lamb, with white fat, soft, thin skin, transparent but dark red flesh, small bone, slender and very white. Let it soften for a few days in a stream of fresh air, and don’t worry that it will turn; of all the meats and all the parts, the lamb is the most resistant. This is the real way to make it utterly exquisite.
Detach the souris [meat around the bone] and cut the bone quite short, without removing it from the quasi [the aitchbone or rump bone], and trim the fat without piling up the flesh.
In an oval daubière make a bed of fresh pork rinds, on top put a layer of onion rings, and another of carrots. Place the lamb, cover it with buttered paper and the lid; put the daubière on the slightly reddened plate of the stove, or on the oval gas stove which is used to cook large fish; let it sweat and lightly prick it.
You will smell the steam coming out, a fine sweet scent announcing the browning of the sugar in the vegetables, when it is time to wash it down with half a glass of dry white wine. Cover and let it cook to a glaze, that is to say à sec, which takes place when you hear a slight crackling.
Wet the skin with lukewarm water; add a bouquet garni, half a head of garlic, a spoonful of coarse salt, two cloves, and cover; boil; skim the foam; move the braising pan back away from the fire, or tighten the gas to small imperceptible pearls so as to maintain only a very modest sourire [smile] instead of visible boiling.
In three hours, turn the lamb, and in two hours you can serve it. Six hours in all, including preparation, sweating, and glazing.
Auguste Colombié (1845-1920)
La cuisine bourgeoise, 1906
What I like about this recipe is its universality: Colombié is speaking not only to cooks of the modern era with stove plates or adjustable flame cooktops but also to those who still, at the dawn of the 20th century, would “move the braising pan back away from the fire.” This is perhaps the ultimate lesson of French cooking: it doesn’t matter what heat source you use as long as you know how to get the sourire you want.
I choose to see in my jambonnière not antiquity but instead this quality of universality. It was built to straddle the hot coals of a 19th century âtre, potager, or fourneau, taking more coals into its lid to create the feu dessus et dessous. At some point its feet were clipped, perhaps so that it could lay directly on the hot plate of an étuve or slide more easily to the cavern of a cuisinière. And with this adaptation it came into the modern era, just as all these ancient recipes were adapted from feu doux, pétit, moderé, assez vif, and grand to low, medium-low, medium, medium-high, and high.
Different signposts along the path, and yet we arrive at the same place. Feu doux. Dessus et dessous. Sourire.


What a stunning piece and truly exquisite restoration! So much to marvel! Thank you for sharing.
Fantastic find and great in-depth research! To the best of my recollection, the best work of craftsmanship that VFC has published to date. There is so much detail to marvel at, both in terms of this masterpiece, and in the complementary background research on cooking in earlier centuries. From this example, as from quite a few other pans presented here at VFC, you can see that the valuable raw material copper was not available in unlimited supply (length of sheet metal) and that resources were used carefully (repairing instead of buying new). The example of how a sheet of metal was formed into a tube to make a haptically pleasant handle is great. My friend Arndt, who tins himself, described to me the difficulties of cleaning and retinning large and complex pans. Hence my respect for the work of Erik Undiks shown here.
The old kitchen equipment reminded me a bit of my grandparents’ kitchen, where the wood-burning stove and oven were still in use for decades. But the best part was the pantry in the grandparents’ house. To this day I do not know a more pleasant smell than the fullness of smell of this pantry. And what do we smell today when we open the refrigerator? Well, when I was a child, I didn’t know anything about the effort involved in baking several loaves of bread in advance, making my own sausages, preserving delicious hams, and canning fruits and vegetables. I was still allowed to watch and marvel at that time.
Unless you had the opportunity to learn how to cook in your own family (traditionally from your mother or grandmother), you will certainly follow recipes closely in the beginning. But once you have gained some experience and seen that there are a thousand variations of a single basic recipe, you will become more casual and will no longer meticulously follow recipes, but will spontaneously vary, go your own way, develop your personal methods and discover your own taste preferences. I also appreciate this “room for interpretation” in the recipes presented here.
Martin, what a lovely commentary, beautifully said. Thank you!